
This post grew from my own bedroom makeover and from talking with readers who want a space that feels stylish yet warm. A wall full of photos can do a lot, but I kept running into looks that felt cold or cluttered. I wanted ideas that stay modern while still making a room feel lived in. So I pulled together ideas for a bedroom photo wall that nails both vibes: clean lines with soft textures, a touch of whimsy, and room to breathe.
This is for you if you love a calm, designed look without wasting hours. If you live in a small room, rent an apartment, or want to swap photos with the seasons, this guide helps. If you care about simple layouts, warm colors, and personal touches, you are in the right place.
I pulled together 25 photo wall ideas that balance a clean modern look with a warm vibe. You will see layouts from tight grids to loose salon walls, a mix of wood and metal frames, and soft textiles that soften the edge. This section covers color palettes, print choices, frame styles, and how to arrange photos so the wall feels intentional, not busy. You will also find budget ideas like printable photos, DIY frames, and small lighting touches that glow at night.
Each idea comes with a quick how to. Start with one anchor print above the bed, then add two or three smaller photos around it. Try a consistent color theme so the wall reads as one piece. Mix frame sizes for interest, but keep a common material like wood or metal to tie it together. If your wall is near a doorway, place the heaviest pieces toward the center and lighter ones outward. These small tweaks make the wall feel curated, not random.
These ideas fit real life. You can borrow from chic minimal looks or cozy rustic vibes. You can use removable hangers if you rent. You can print photos from your phone and swap them as the seasons change. The goal is a space that shows you care without feeling fussy. You can build the wall in stages and still enjoy a fresh room today.
Here is why this works. It puts your photos into a simple plan you can follow. It answers common questions about placement, color, and durability. It also gives practical options for different budgets. Next steps are easy: pick a vibe, gather a few photos, choose frames, and test a layout on the floor before you hang. Dive in and make your bedroom feel modern and warm with a wall you love.
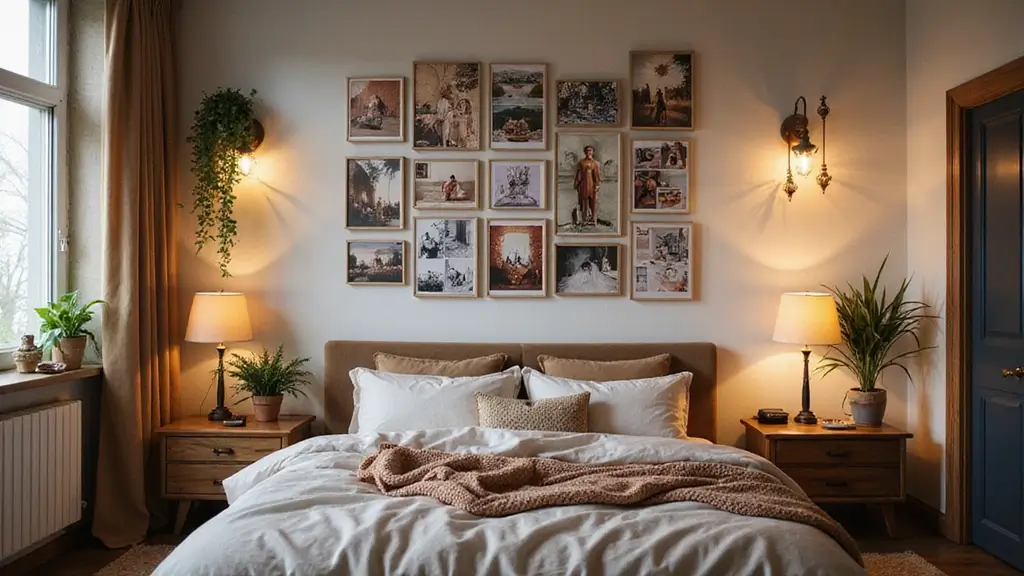
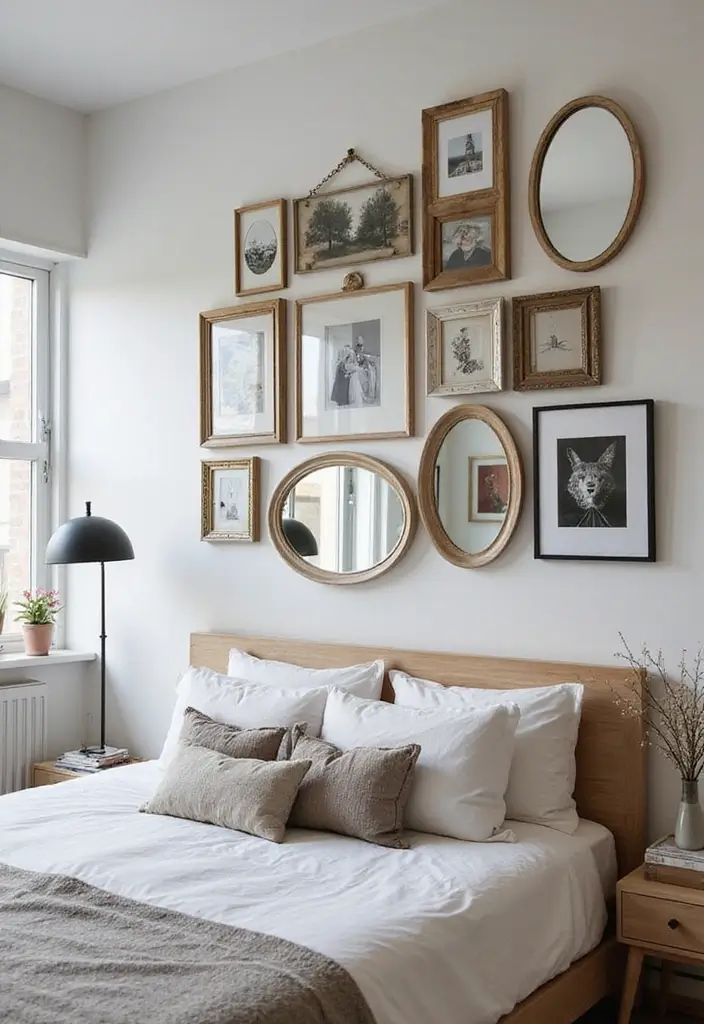
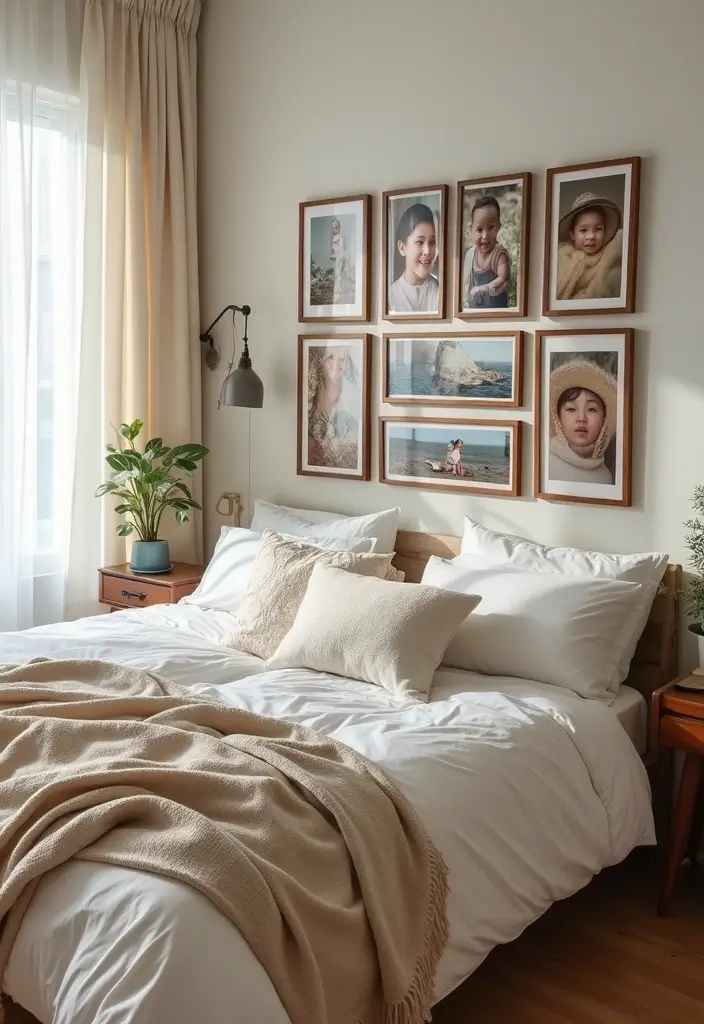
1. Gallery Wall with Vintage Frames
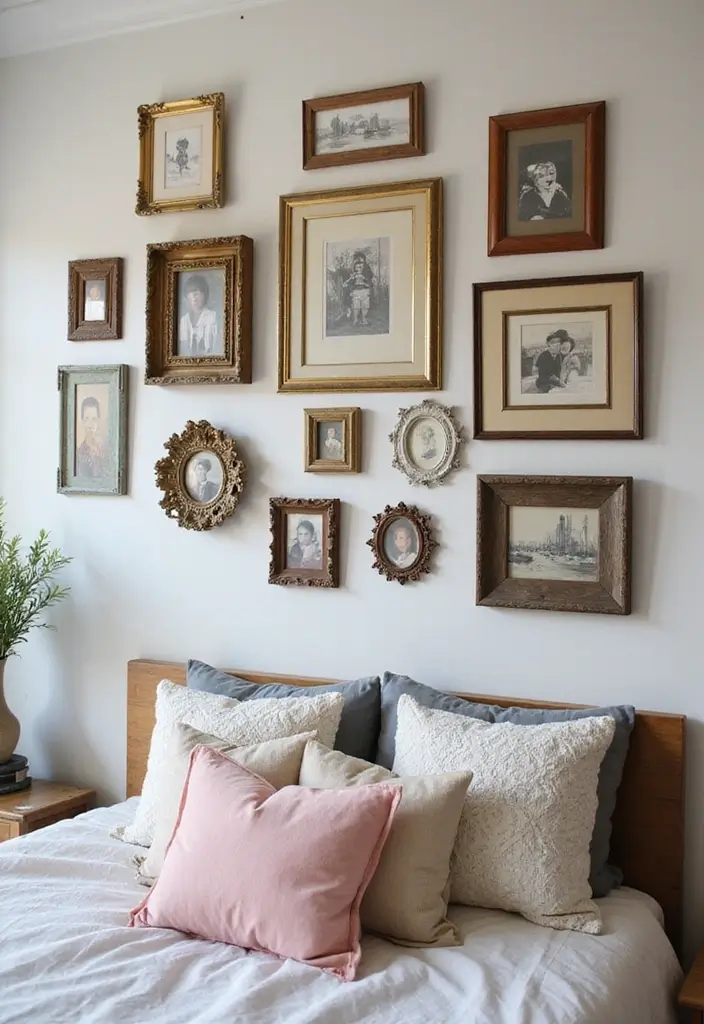
If you want a wall that feels warm and organized, a gallery wall of vintage frames can do the job in your bedroom. It adds texture, character, and a clean, modern look.
Here is why this method works: the mix of frame shapes keeps the eye moving and makes a plain wall feel alive.
– Choose four to six frames in different sizes to build a balanced group.
– Mix finishes like distressed wood, brass, and soft painted edges so the set reads as one.
– Fill frames with a mix of photos and keepsakes, such as family portraits and vintage postcards.
– Center the layout by placing the largest frame in the middle and surrounding it with smaller ones.
– Keep a quiet rhythm by sticking to a few color tones while varying the shapes.
– Map the plan first with painter’s tape, then hang using proper hardware.
– For renters, use removable hooks to avoid extra holes.
– Finish with a small offset piece, like a round mirror, to catch light.
Tips:
– Use painter’s tape to outline the layout before you drill.
– Group frames by color family for harmony.
With this approach, your room gains warmth and a story you can refresh anytime.
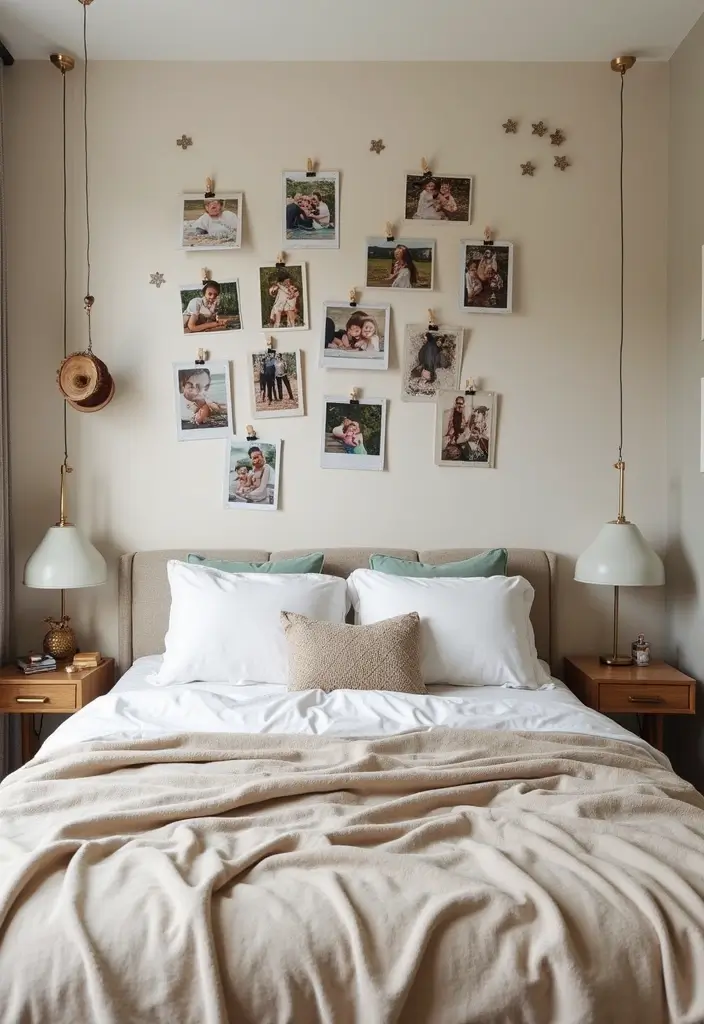
2. String Lights with Polaroids
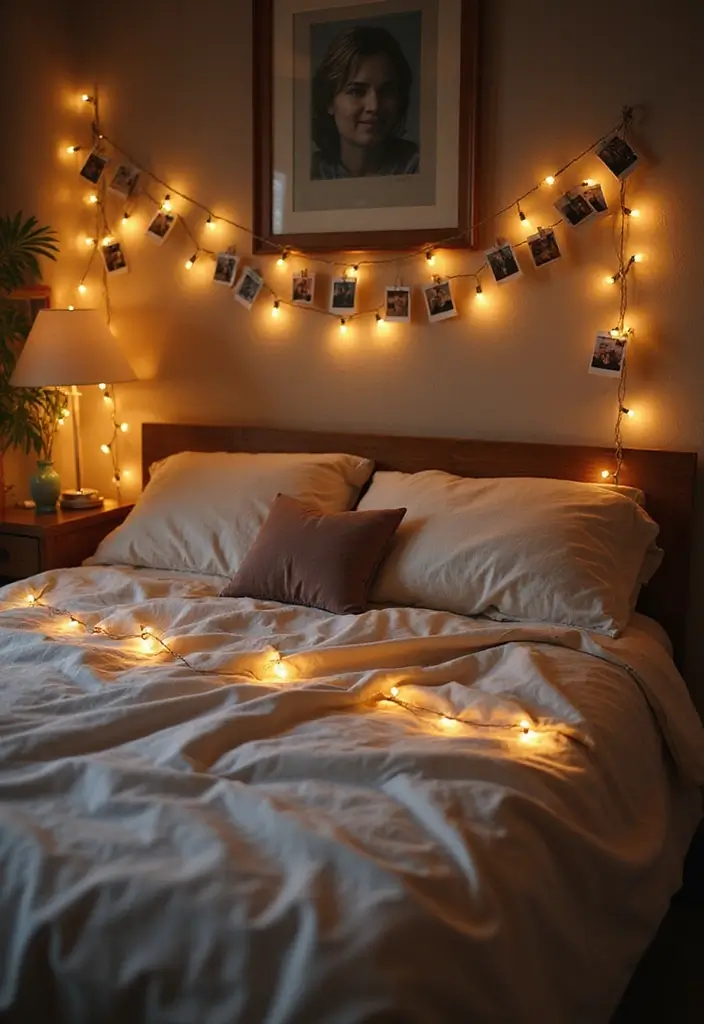
You want a photo wall that feels warm and easy to keep. A string of lights with Polaroids can do it.
First, pick the lights. LED strands give a soft glow and stay cool. A 6 to 8 ft strand fits most rooms. If you want color, choose a gentle tint, or stay white.
Then plan your shape. Try a simple line along the wall, a small heart above your nightstand, or a loose wave that follows the bed. Lay out the path on the floor first to know where to place clips.
Next, clip your photos. Use tiny wooden clips, clear pegs, or metal clips. Attach photos in a mix of sizes to keep it lively. Space photos evenly or cluster them for a gallery vibe.
Add texture with dried flowers or small greenery on the strands to give the wall a cozy touch.
Pro tip: LED lights save energy and stay cool. Use removable hooks or tape so you can swap photos without damage.
Start with a simple line and a favorite shot. Swap photos each season to keep the look fresh. You can swap pics anytime to keep the wall feeling new. It stays easy to update.
3. Monochrome Photo Collage
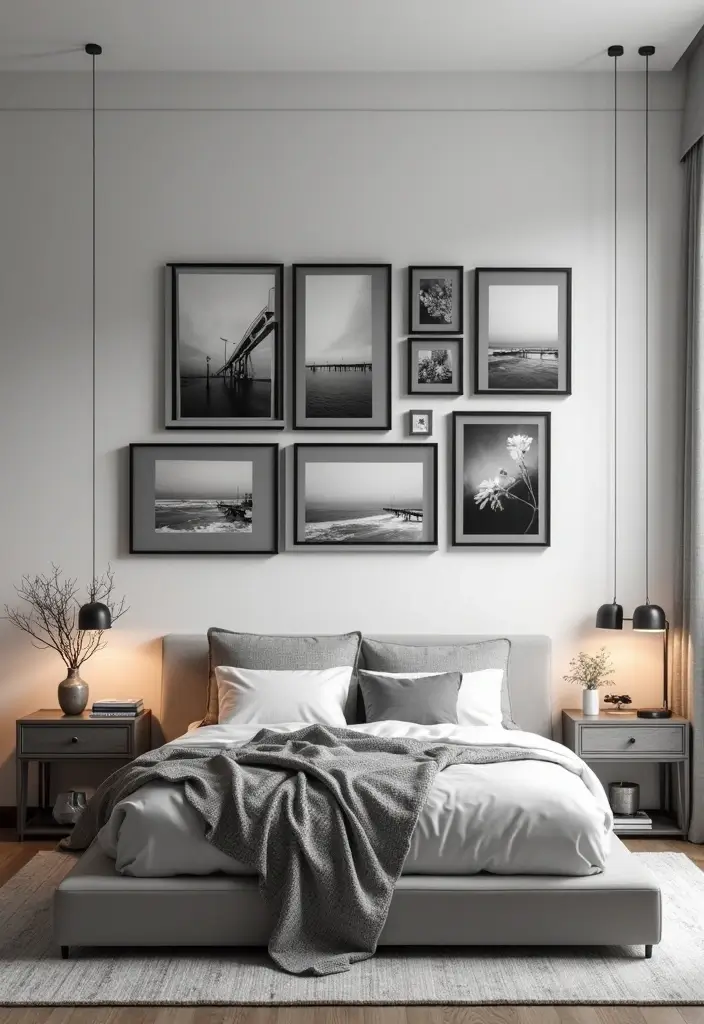
Looking for a wall that feels modern yet warm? A monochrome photo collage does it with ease. Black and white images focus on mood and meaning, not color.
To pull it off, start with a plan:
– Pick a theme you love—travel, everyday moments, or abstract textures. Aim for 8 to 14 photos in different sizes.
– Decide on prints that feel cohesive. Mix matte and glossy finishes to add depth.
– Choose a layout you like. A tight grid reads clean and gallery-like, while a layered, off-kilter arrangement feels artistic.
– Keep the color out for now. Let light, shadow, and facial expressions do the talking.
Set it up with care:
– Map the wall first. Use painter’s tape or a string grid to preview the exact placement.
– Decide how you’ll mount. Frames keep things neat, while simple clips or washi tape create a casual, changeable vibe.
– Group photos by contrast. Place high-contrast images near the center to draw the eye, then tuck softer tones around the edges.
– Think about lighting. Soft daylight or a warm bulb helps the blacks pop without looking harsh.
Maintenance tips:
– Rotate a few photos every season to refresh the look.
– Keep frames level and nails straight for a neat finish.
– Clean prints with a gentle, dry cloth to avoid smudges.
Creative Insight: Use washi tape to attach photos to the wall for a fun, non-permanent setup you can swap anytime.
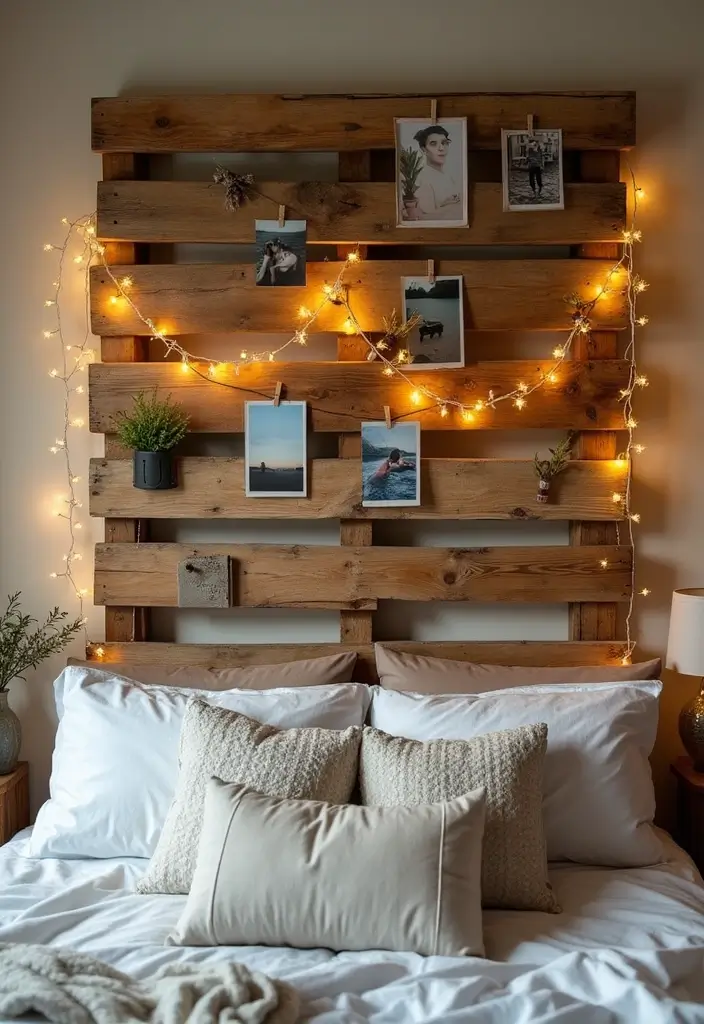
4. Wooden Pallet Display
Want a wall that feels warm and modern? A wooden pallet photo display can do that. It adds texture and a rustic touch to your room. You repurpose a pallet, clean it, and mount it on the wall. Sand it smooth, wipe away dust, and seal it so it lasts. Attach your photos with clothespins or tiny hooks. You can mix in little decor like succulents or a string of fairy lights. This setup fits bohemian or farmhouse vibes. Tip: Paint the pallet in a soft pastel or earthy tone to match your bedroom and create a cozy mood.
Here is how to do it:
– Prep the pallet: remove loose boards, sand, and seal with a clear finish.
– Mount safely: screw into studs or use wall anchors so it stays flat.
– Arrange your photos: slide in clothespins or hook the corners. Leave uneven spacing for charm.
– Add accents: tuck in a small plant, a few shells, or a warm light string.
– Finish the look: you can leave raw wood, whitewash, or paint in a muted color.
This project is budget-friendly and lets you refresh photos anytime without drilling new holes. It’s a sturdy, stylish statement for any bedroom. Change photos with the seasons.
5. Hexagonal Photo Arrangement
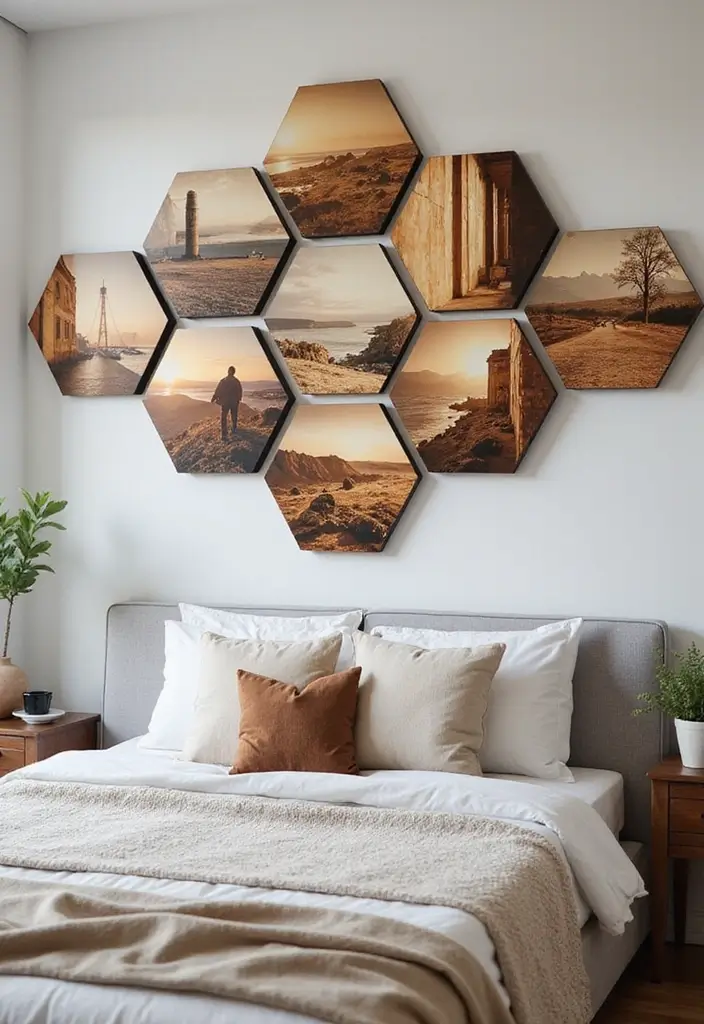
Want a wall that feels clean and warm? A hexagonal photo arrangement does it. It gives a modern edge without shouting.
– Start with a plan. Decide between one large hex or a honeycomb cluster. A single hex frame holds your favorite shot. A cluster adds depth.
– Pick frames. Try wood with glass or a matte metal frame. Mix sizes for visual interest.
– Layout on the floor first. Use paper cutouts or tape shapes to test the look.
– Space and alignment. Keep about 2 to 3 inches between frames. Light guides help keep the pattern neat.
– Color and texture ties. Pick frame colors that echo your bedding or rug.
– Light and finish. Soft wall lighting makes the hex pattern glow. Avoid glare on glossy glass.
– Quick test task. Trace shapes on kraft paper, cut them, and tape them on the wall to preview.
Design tip: Leave a calm margin around the group. A few simple frames with quiet photos keep the space from feeling busy, especially in a small room.
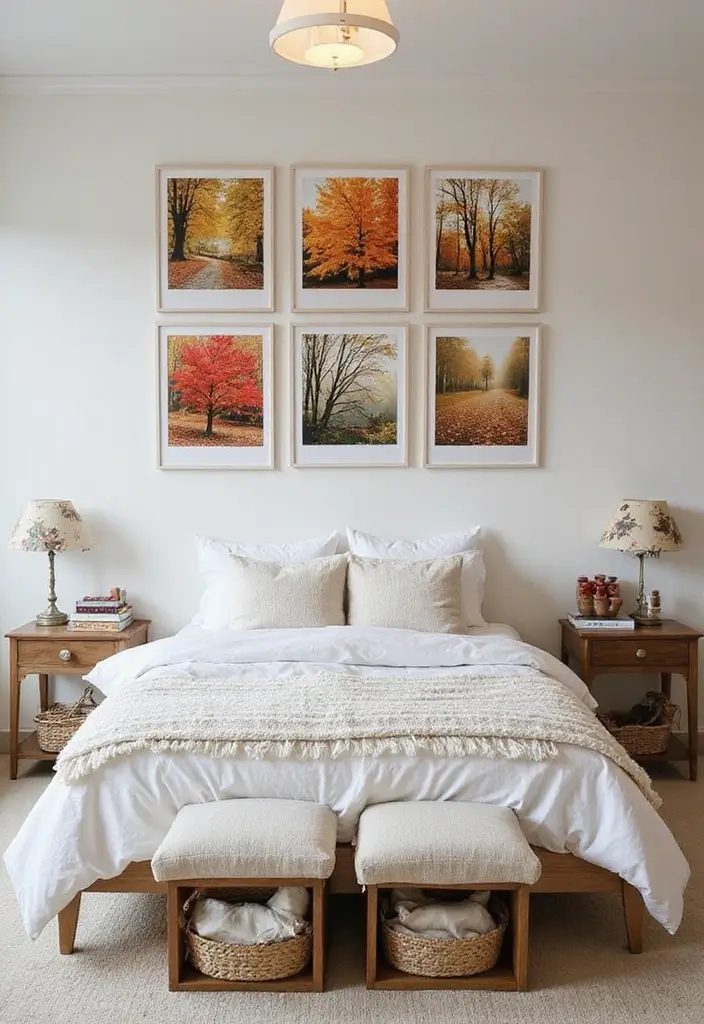
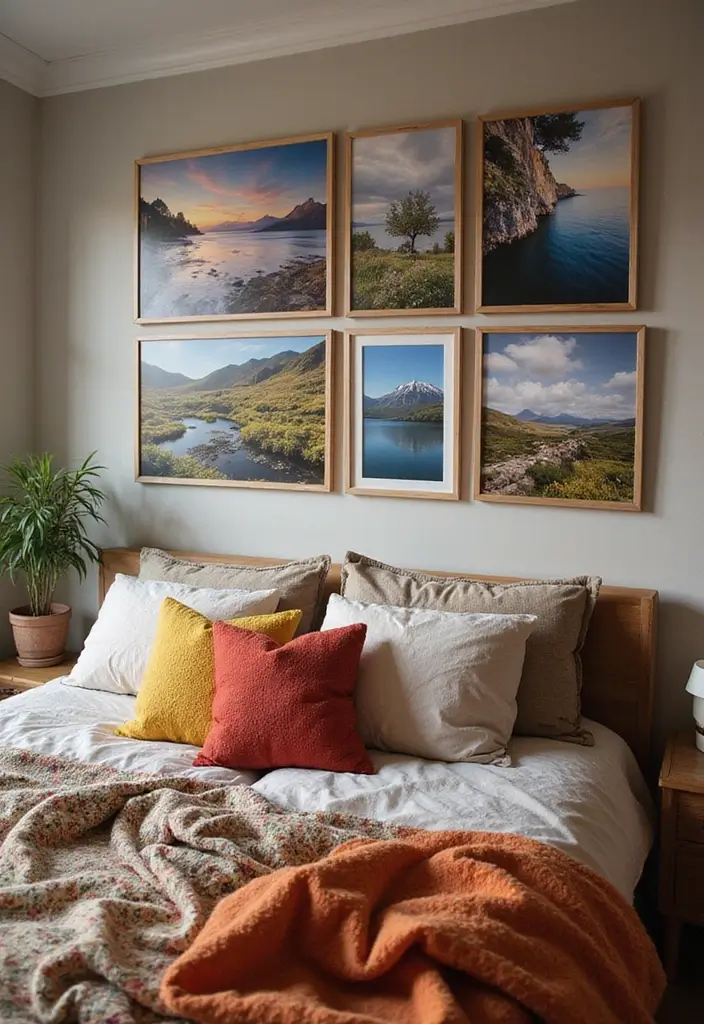
6. Nature-Inspired Photo Wall
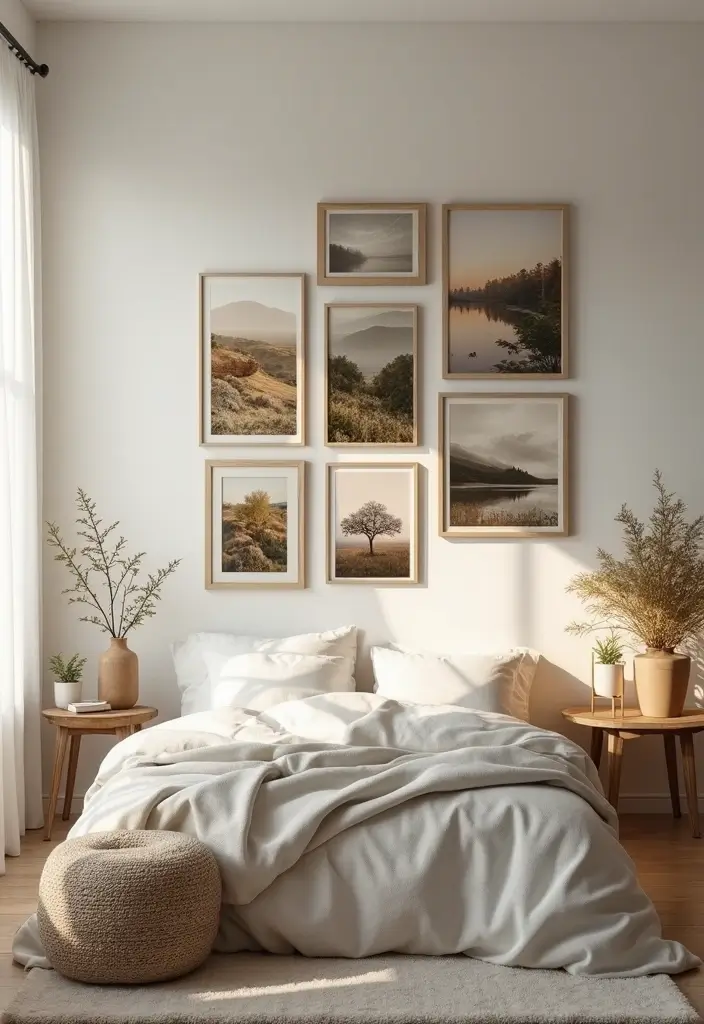
Want a bedroom that feels calm and warm? A nature-inspired photo wall can do that. It brings the outdoors inside and adds a soft, grounded look.
Here is why it works: earth tones connect with your room, natural textures add depth, and a mix of landscapes, plant shots, and memory photos keeps you centered.
Pro Tip: Use a matte finish for your photos to reduce glare, making them easier to view all day.
To start, gather:
– Landscapes from trips
– Plant close-ups
– Your favorite nature moments
Choose earth-toned frames or skip frames to let images hug the wall. Add dried flowers, leaves, or small wood elements for texture.
Layout ideas: use a clean grid for a calm vibe, or an organic cluster for a living feel. Keep a consistent color range so the wall reads as one piece.
Next steps: print with a matte finish to cut glare. Hang at eye level with comfortable spacing, and leave room around each piece. Stand back, adjust as needed.
Next, rotate a few prints with the seasons to keep the look fresh. Materials you might use: lightweight frames, twine, small driftwood hooks, or dried stems in a shallow vase on a shelf nearby.
Give it a try.
A nature-inspired photo wall invites serenity into your bedroom. Surround yourself with the beauty of landscapes and plants, creating a cozy retreat that feels both warm and grounding.
7. Minimalist Frame Grouping
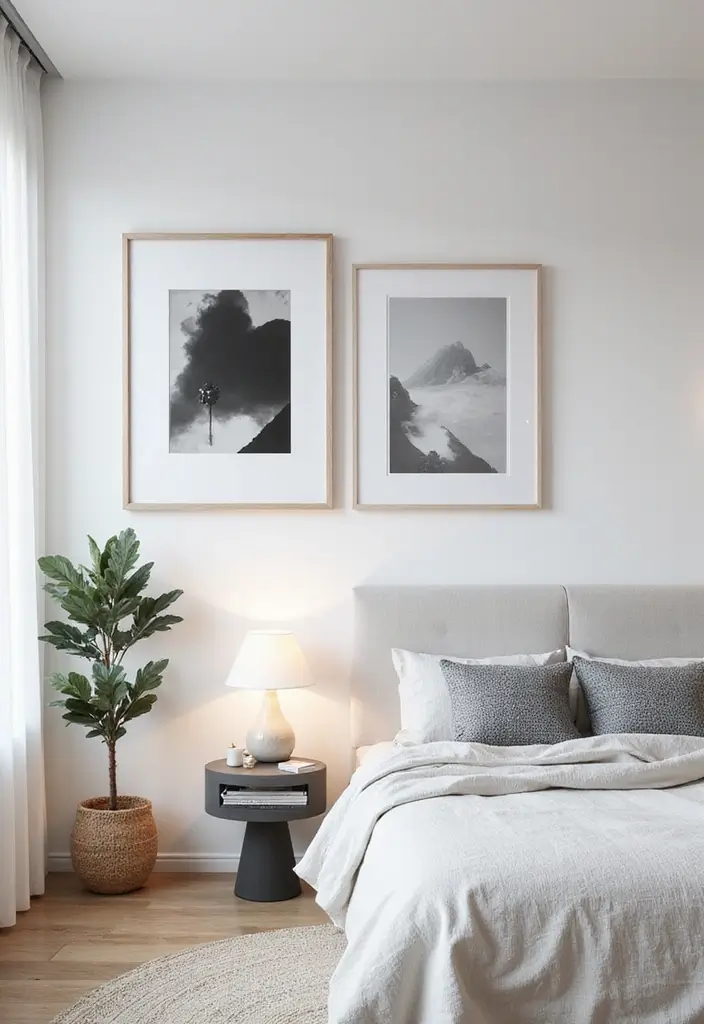
Are you looking for a wall that feels warm but not crowded? Minimalist frame grouping helps you get that balance. It uses few frames, clean lines, and soft colors so things stay calm. You see every photo clearly, not a wall full of noise.
– 3 to 5 frames: pick the same style and a slim profile. Too many frames can feel busy.
– Imagery: choose 2 kinds—black-and-white photos or simple abstract art. They pair well and stay easy on the eyes.
– Frame choice: go with light wood or pale metal. Keep edges clean and corners simple.
– Layout: line the frames straight along a wall section or play with a gentle stair-step to add movement.
– Spacing: try 2 to 3 inches between frames. Keep the top or center at eye level for easy viewing.
– Setup method: lay the frames on the floor first to check the feel. Map the wall with painter’s tape before you drill.
– Design note: White walls help the setup breathe and let each image pop.
Next steps: rotate photos seasonally or swap in a different set of frames to refresh the space without a full redo.
8. Themed Travel Photo Wall
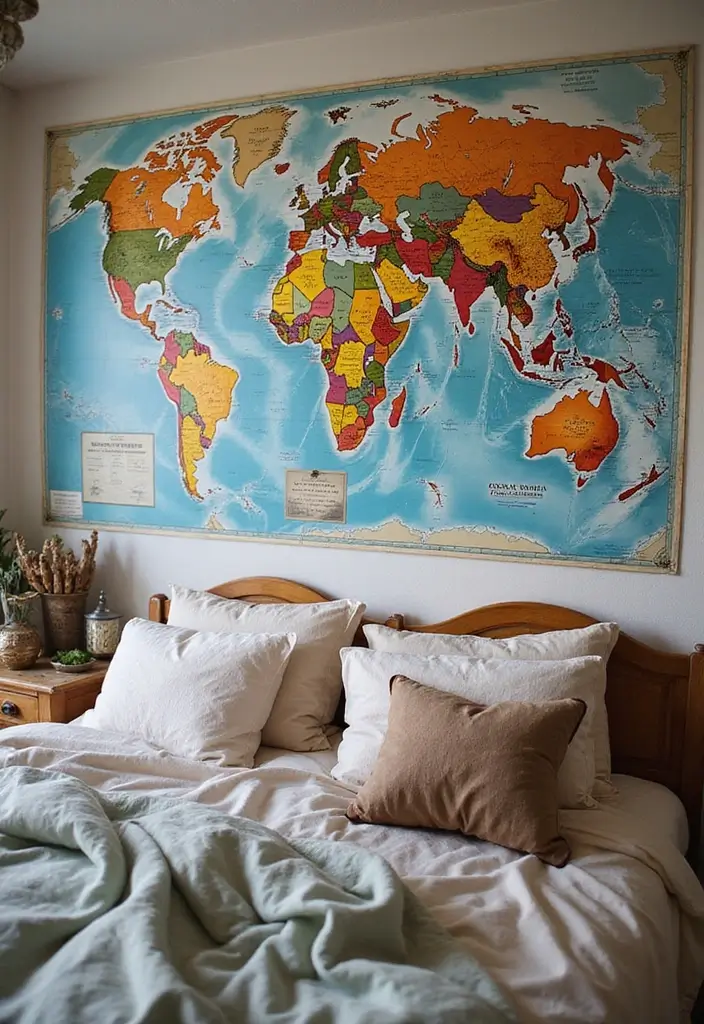
Want a travel photo wall that feels warm and clear in your room? A themed wall lets your trips shine without loud talk. You turn a blank wall into a map of memories you see every day. When you walk in, you feel a sense of places, moments, and stories.
Here is why it helps: it keeps memories visible and adds warmth to your space.
What you’ll need
– A base anchor: a large map print, a cork map, or a wire grid that holds photos.
– Photos with variety: landscapes, candid moments, iconic spots.
– Small decor bits: postcards, a compass, travel tickets, or stamps.
How to plan and place
– Mix sizes and finishes so the wall stays lively but calm.
– Let the map guide the flow. Place photos that match routes you took.
– Choose 2–3 colors from your photos to tie the look together.
– Pick frames that are easy to swap when you add new trips.
How to build
– Lay out on the floor first. See how it feels before you hammer a nail.
– Hang one anchor piece first, then add photos around it.
– Use Creative Tip: colored string to link a photo to its pin on the map.
– The colored lines trace your routes and invite touch and curiosity.
Maintenance and updates
– Swap in a few new photos every season.
– Keep the space soft with a calm wall color and light frames.
Next steps.
9. Framed Mirrors with Photos
Framed mirrors with photos
You want a photo wall that feels modern and warm. Try framed mirrors with photos. Mirrors bounce light around the room and make walls feel bigger. Pair them with your favorite images to keep memories in view.
Here is how to pull it off.
– Pick one main mirror, about 24×18, and 3–6 photo frames in two finishes. Try wood and metal for contrast, or keep one finish for calm.
– Plan the layout on the floor first. You can try a grid around the mirror or a loose cluster. Leave a small, even gap between items.
– Choose a color story. Warm neutrals work in most bedrooms. Add a dark frame or light wood to wake things up.
– Hang with care. Secure the mirror first, then add photos. Use wall anchors if there’s no stud.
– Light the display. Put it where natural light or a lamp can catch the frames and reveal textures.
– Rotate and clean. Wipe the glass with a cloth. Swap in new photos each season to keep the wall fresh.
Example: In a soft gray room, a large round mirror sits in the center with four rectangular frames around it.
Tip: Keep the mirrors clean so light keeps bouncing around.
10. Floating Shelves with Photo Displays
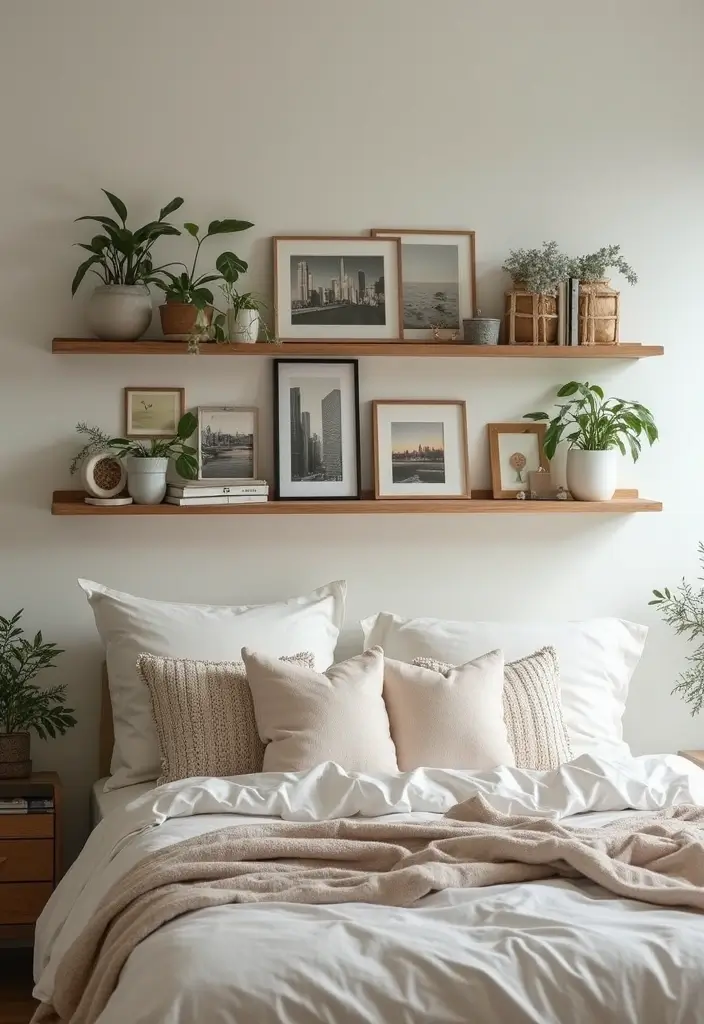
If your photo wall feels flat, add depth with floating shelves. They let you layer photos with small plants, books, and tiny art. Place photos on shelves at different heights for a natural, casual look. Mix framed images with unframed prints for texture.
Shelves stay flexible. You can swap pictures or add new decor as your collection grows. This keeps your room personal while keeping a clean, modern vibe.
Design Insight: Choose shelves in wood or metal that match your room. Wood adds warmth. Metal gives a cool edge.
Here is how to set them up:
– Start by picking a wall and two to three shelves.
– Hang at eye level.
– Plan a cluster with odd numbers for balance.
– Add photos first, then tuck in a plant or small book to fill gaps.
Keep it fresh. Dust every few weeks. Rotate pieces with the seasons. Use different frame sizes for texture.
Common questions:
– Can I place shelves over the bed? Yes, as long as you leave a safe margin and use sturdy mounts.
– Do I need nails or screws? Use wall anchors.
– How many shelves to start? Two to four is a good place to begin.
11. Boho Macramé Photo Hang
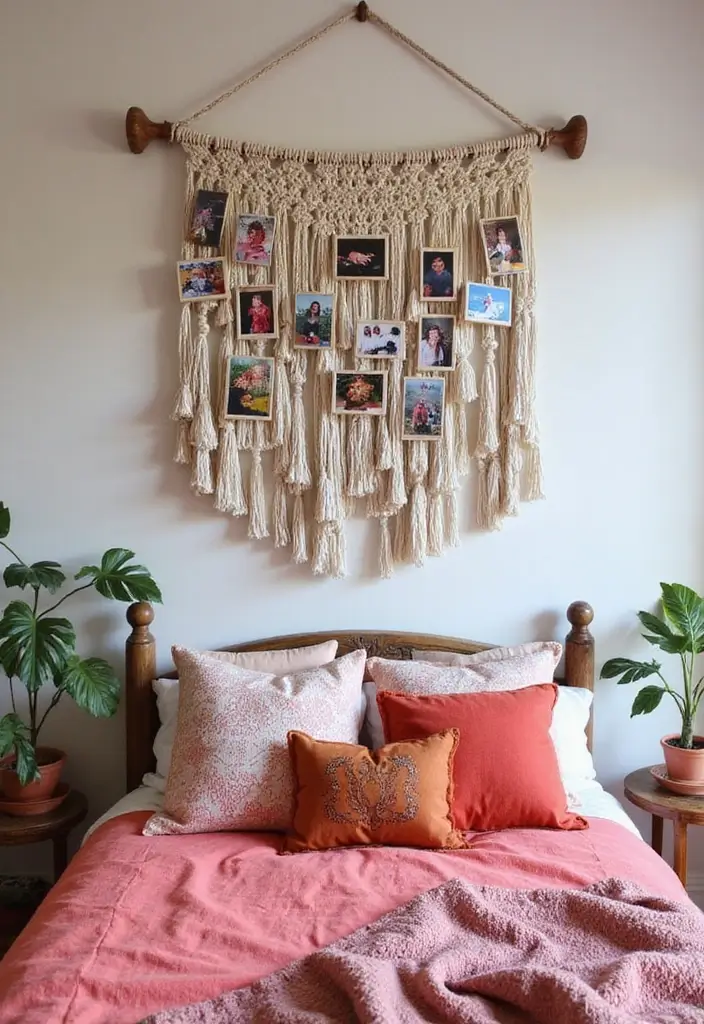
Want a wall that feels warm and stylish? A Boho Macramé Photo Hang adds texture and a personal touch. It fits a modern bedroom with its woven lines catching light.
Here is why it works. It creates a soft, handmade vibe without taking up floor space. It also lets you swap photos as your wall changes.
Next steps:
– Gather 3 to 6 photos with a similar color mood so they read as a set.
– Pick a macramé hanger. Choose natural cotton rope about 4 to 6 mm thick. Neutral shades like ivory, taupe, or soft sage work best.
– Set up the hanger. Use a ready-made piece or knot a simple 3- to 4-strand cord to a ring.
– Attach photos. Clip each photo to the inside of the knots with tiny clips.
– Display options. Hang the piece directly on the wall. Or wrap the hanger around a small branch for a nature-inspired twist.
– Care and updates. Dust gently with a soft cloth. Rotate photos every few months to keep it fresh.
Craft Tip: Neutral or earthy tones on the macramé let the photos pop and warm the room.
Whenever a photo changes, swap it in to keep the wall feeling fresh.
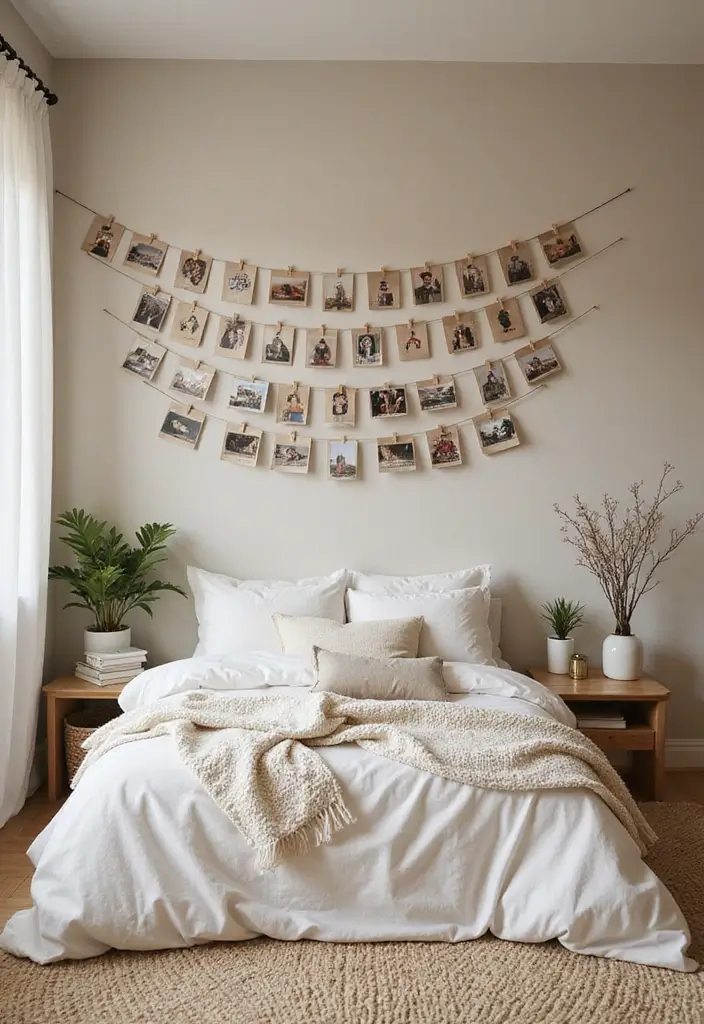
12. Colorful Washi Tape Layout
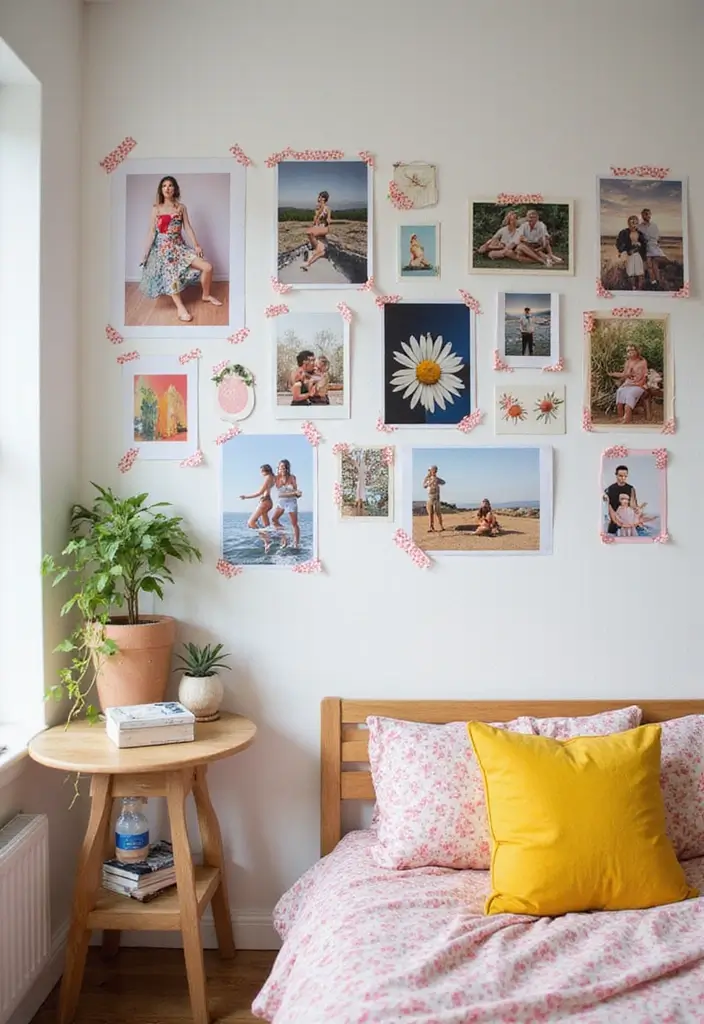
You want a playful wall that shows photos without nails. Colorful washi tape lets you pin pictures to the wall and adds warmth. This simple layout makes your room feel friendly and bright. It’s easy to swap whenever you want.
What you need
– washi tapes in bold colors or patterns
– photos or prints
– scissors or a craft knife
– a ruler or straightedge
– a pencil for light marks
Plan your look. Pick a shape or a clean grid. Try a border, a straight line, or a small cluster in a corner. Bright colors read lively; pastel tones feel calm. Your choice should match your room style and mood.
How to do it
– Clean the wall first so the tape sticks good.
– Place tape strips where you want pictures. Press them flat.
– Attach photos to the tape. You can link them with small tape pieces to form shapes.
– If you want a pattern, mark the shape lightly and follow it.
Why this works
– It’s temporary. Swap photos when you want a fresh vibe.
– It adds color and texture without nails or paint damage.
– It suits many styles, from cute to modern.
Tip: Peel tape slowly at a low angle to avoid paint coming up.
Next steps
– Pick two colors that fit your room.
– Sketch your layout on paper, then transfer it to the wall.
Transform your walls with colorful washi tape! It’s a playful way to showcase your favorite memories, and the best part? You can change it up whenever you want!
13. Inspiring Quotes with Photos
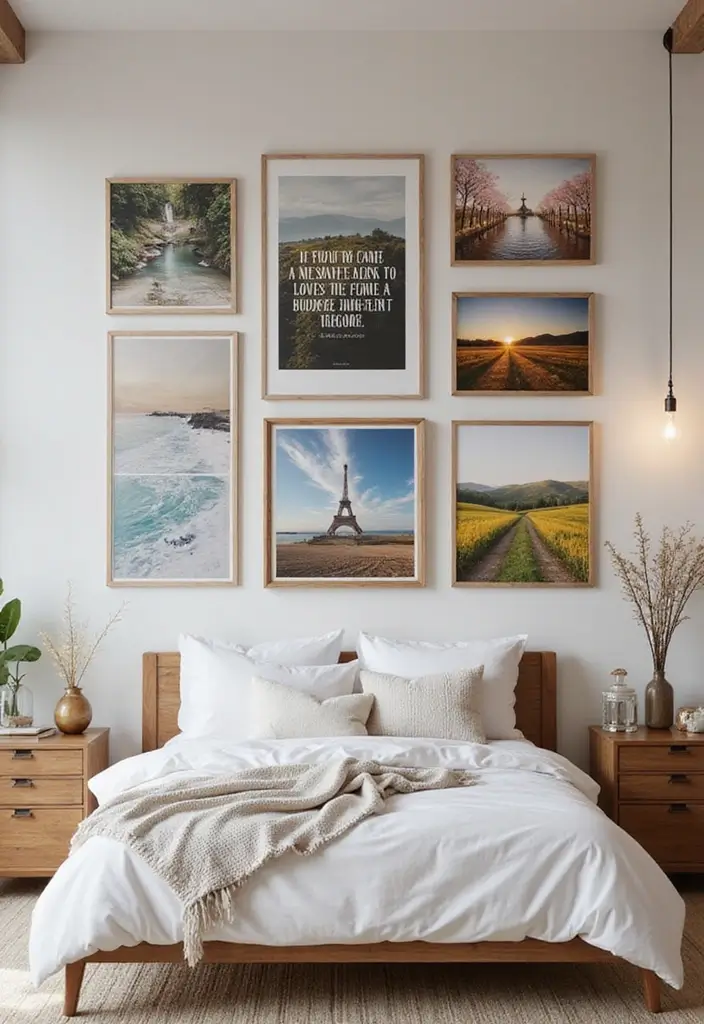
You want a wall that feels personal and warm. Inspiring quotes with photos can make that happen. This combo turns a plain space into a living mood board. Here is a simple plan you can follow.
Here is how to start.
– Choose quotes that matter. Choose lines that lift you up today. Keep them short so they read well from a distance.
– Pick matching photos. Look for images that share color or mood with the quote. A calm sky pairs with hopeful words, while a cozy kitchen scene fits warm notes.
– Decide on a layout. Try a clean grid for calm, or a salon style with varied sizes for character. You can also string items on a thin wire for easy changes.
– Print and frame. Print on good photo paper. Use frames in the same tone, or mix light woods for texture.
– Hang with care. Measure the wall, mark a light grid, and use a level. Space each piece evenly so your wall reads as one piece.
– Finish with touch and tone. Add a soft mat, warm bulbs, or a small plant nearby. These details pull the display together.
– Placement and rhythm. Place the cluster at eye level. Leave breathing room around to keep it readable.
Next steps. Gather a few quotes and photos this week. Start with a small cluster, then grow over time.
Transform your wall into a cozy escape! Pair inspiring quotes with photos that resonate, and watch your space come alive with warmth and personality. Make it your personal mood board!
14. Art Prints Mixed with Photos
You want a wall that feels cozy, modern, and uniquely yours. Mix art prints with your photos to create a living gallery. Choose bold art prints that share a color cue or a theme with your photos. Let the colors link different pieces so the wall flows together. This approach shows both your taste and your memories in one place.
Mixing styles keeps the look fresh. Pair a clean, minimalist print with warm, personal photos. Use different frame styles to boost the eclectic vibe, black metal, light wood, and white frames all work. Vary sizes too. A tall print next to smaller photos adds rhythm and surprise.
Design Tip: Use odd-number groupings. Odd groups feel balanced and lively. Try three, five, or seven pieces together for a natural, gallery-like balance.
Here is why this works. Next steps.
– Choose five pieces to begin.
– Cut paper shapes the size of your frames and test layouts on the floor first, then on the wall.
– Gather a mix of photos and prints that share a color cue.
– Pick frames that echo your room with black, wood, or white finishes.
– Hang them with a level and leave space around each piece.
– Step back, adjust, and enjoy your new gallery wall.
15. Color-Blocked Display
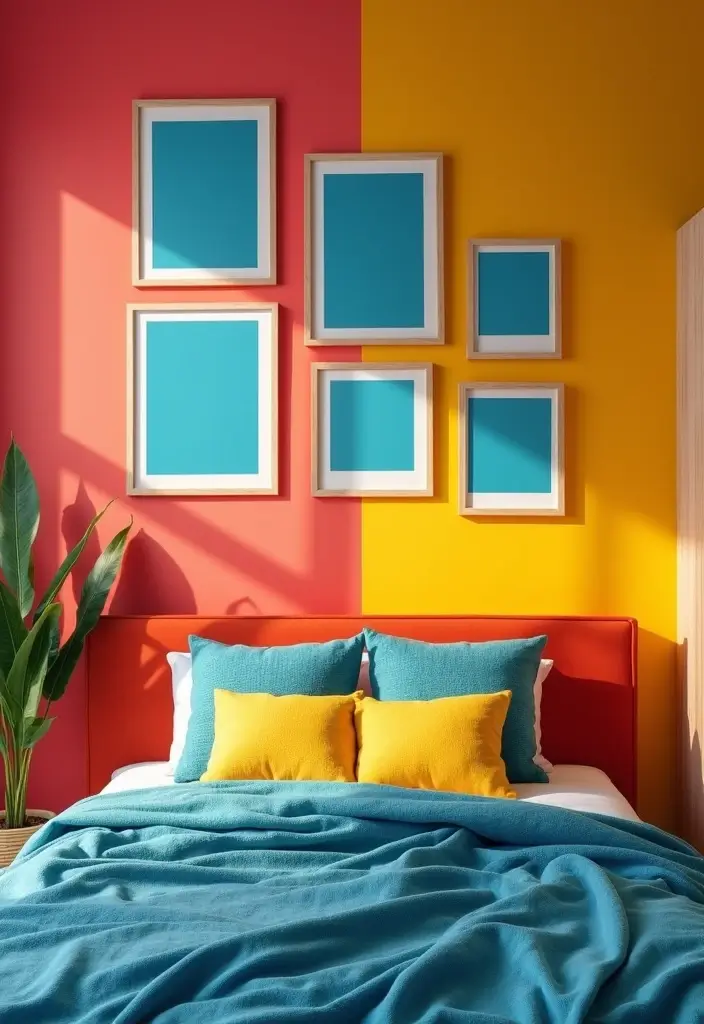
Color-Blocked Display
Feeling stuck with a plain photo wall? A color-blocked setup can turn a simple collection into a warm, modern focal point. Here is why this works: it highlights a color story and brings harmony to your room.
How to do it
– Pick a color story. Choose photos that share a single color family or show shades of the same hue.
– Decide your frame plan. You can use all the same color frames for a clean line, or mix shades for a lively, cinematic feel.
– Plan the layout. Try a grid for order or a loose cluster for an artful vibe. Measure the space and mark the center before you hang.
– Keep the background even. Use photos with similar brightness or a consistent white border to hold the color story together.
– Light the wall. A warm lamp or string lights nearby can make the colors pop at night.
What you gain
– A strong center point in your bedroom.
– A cozy mood that still looks polished.
– Easy updates: swap out photos within the same palette when you want a fresh look.
Tip: For cohesion, limit the palette to 2–3 colors and keep photo backgrounds similar.
Next steps
– Lay out the photos on the floor first. Map the grid with painter’s tape.
– Hang with a level and a steady hand. Adjust until edges are even.
16. Seasonal Photo Wall
If you want a bedroom that feels new with the seasons, try a seasonal photo wall. You swap pictures to fit the mood, and your room stays warm and inviting all year. It gives you a gallery-wall look that is easy to refresh.
Here is how to set it up.
– Display base: Choose a corkboard, a frame grid, or a simple wire with clips so swapping photos is quick.
– Set a swap schedule: Plan changes monthly or with each season and keep a small reminder on your calendar.
– Prep photos: Gather favorites, crop to square or 4×6, and balance tones so each season reads well.
– Plan the layout: Try a grid or a loose salon style, lay proofs on the floor, and photograph the plan.
– Seasonal themes: Spring pastels and fresh blooms, summer beach days, autumn leaves, and winter cozy family moments.
– Keep it simple: Use a standard set of frames and store off-season photos in a labeled box for quick swaps.
– Small decor boost: Add dried flowers, shells, or tiny trinkets to give each season a tiny story.
Next steps: start with a small wall, then grow. This easy setup makes your room feel alive without clutter.
17. Layered Textiles with Photographs
– What it is Layer photos on fabric to build a warm photo wall.
– It uses quilts, woven pieces, or embroidered textiles as the backdrop.
– You place photos on top to create a multidimensional display.
– Let the fabric color echo the tones in your photos for harmony.
– This look fits a Bohemian room with texture and a soft, lived feel.
– The fabric texture makes the wall feel warm even before the lights go on.
– Your textile photo wall can become a cozy feature that sparks conversations.
– Why it helps Here is why textiles soften the photo wall and the whole room.
– A fabric backdrop adds light texture, which guides the eye through your memories.
– The mix of prints and fibers gives the wall a calm, inviting vibe.
– How to do it Start with a large fabric panel as the backdrop.
– Drape or mount fabric so it stays flat and smooth behind your photos.
– Arrange photos on the fabric, then secure with removable adhesive.
– Use a mix of photo sizes to create visual rhythm.
– Choose fabrics in warm neutrals or muted colors to keep focus on the images.
– Finally, add soft lighting to bring out the texture without glare.
– Tips If you rent or hate wall damage, use a freestanding fabric board.
– You can swap photos seasonally for a quick refresh.
– Next steps Pick a fabric, gather photos, and start with a small section today.
18. Personalized Clipboards with Photos
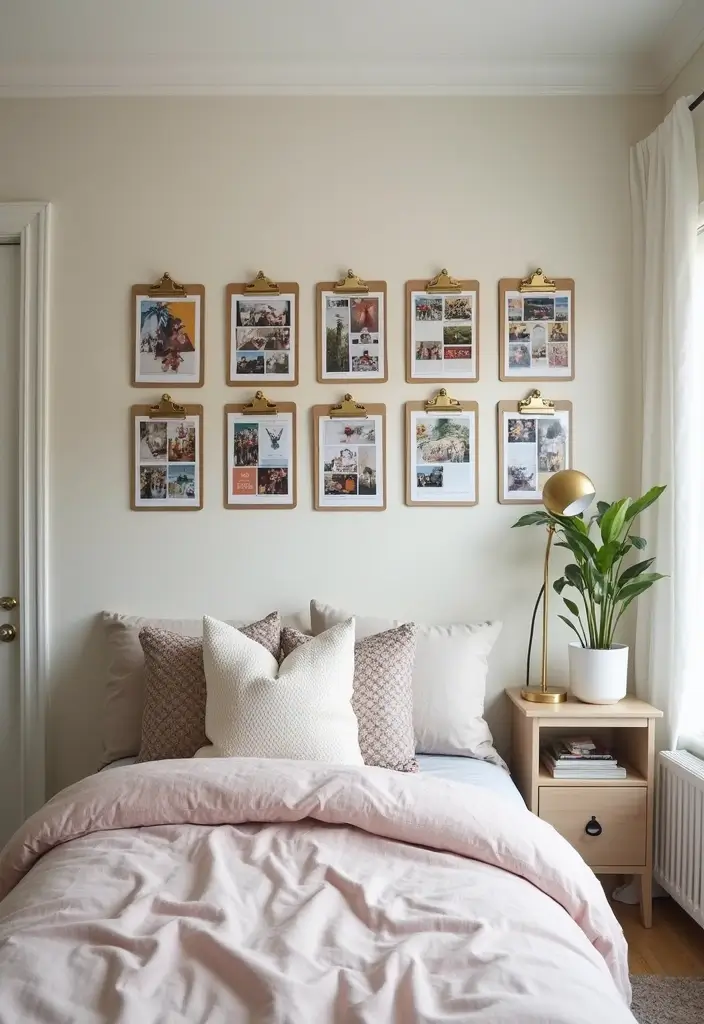
Want a photo wall that feels playful yet warm? Personalized clipboards do that. They offer a quick, carefree way to show memories. You can swap in new photos in seconds and keep the wall fresh.
Here is how to pull it off:
1) Pick clipboards in colors or patterns that fit your bedroom mood.
2) Place them in a staggered grid for a lively, modern rhythm.
3) Clip in photos, postcards, or tiny prints that fit the boards.
4) Create a clean look by keeping some boards neutral and a few pops of color.
5) Mount with small nails or hooks and leave even spacing so the wall breathes.
6) If you want a unified look, spray paint the clipboards first to match your decor.
More tips to fine tune the display:
– Choose clipboards in wood, metal, or sturdy plastic to match your style.
– Print photos in standard sizes like 4×6 or 5×7 for a tidy grid.
– Try a mix of photo finishes, such as matte and glossy, to add texture.
Creative Tip: Match the clipboards to your room’s colors, or go bold with a bright palette to make the wall a focal point.
19. Bohemian Feather and Photo Combo
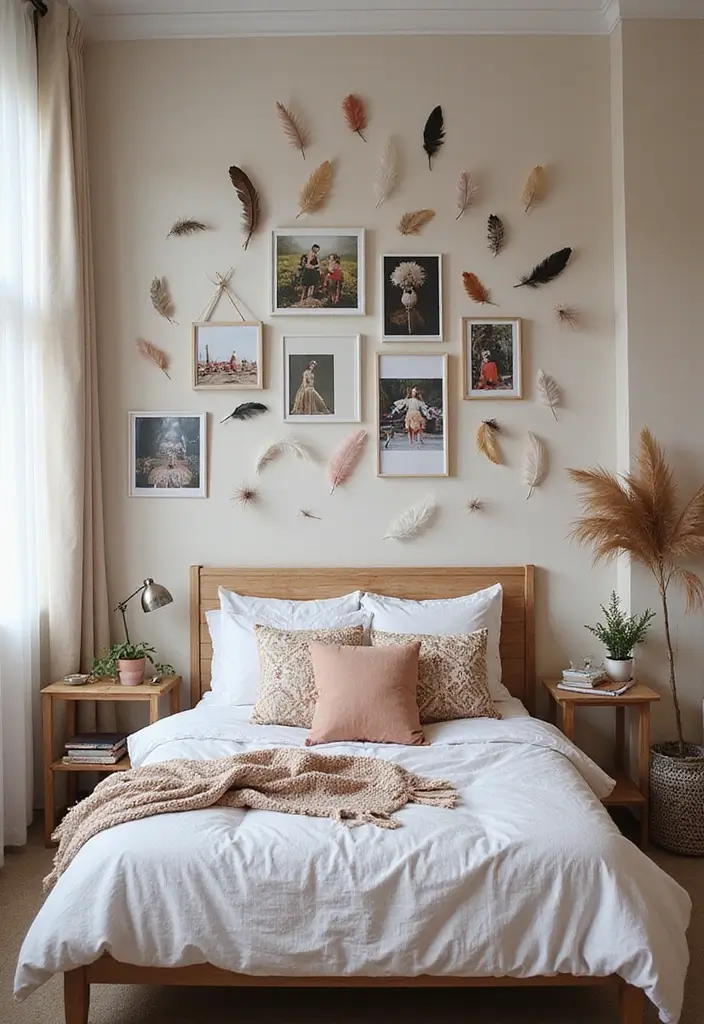
You want a bedroom wall that feels warm and free. The Bohemian Feather and Photo combo can give you that look. It blends feather accents with photos for a soft, airy mood. This bohemian wall decor adds texture without shouting.
What it looks like:
Feathers and framed memories share the same space. Feathers sit beside photos in small clusters. You can use peacock, turkey, or plain white feathers for texture and color. The mix keeps things lively but calm, a true boho vibe in a tidy layout.
How to pull it off in 6 steps:
1) Start with a calm backdrop. Light walls help your colors stand out.
2) Mix frames. Try wood, metal, and white finishes in different sizes for depth.
3) Build a feather mix. Place 3–5 feathers near each photo set.
4) Plan clusters. Group 2–4 photos near each feather with varying frame heights.
5) Mount carefully. Use removable hooks or clips so you can shift things later.
6) Light it softly. A warm lamp or string lights adds a gentle glow.
Care and tips:
– Feathers shed, so wipe them gently and rotate photos every few months.
– Keep humidity low to prevent warping and wear.
– Refresh clusters with seasons or moods to stay fresh.
Tip: A neutral wall makes feather colors pop and keeps the space cozy.
20. Chalkboard Photo Collage
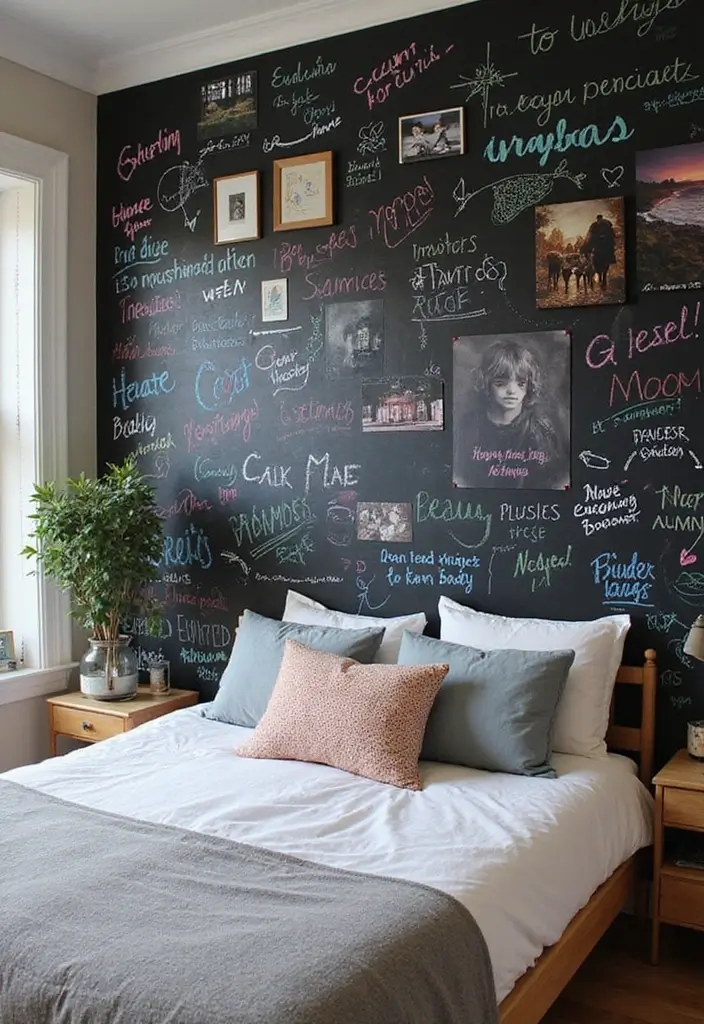
If you want a wall that feels warm and awake, try a chalkboard photo collage. Paint a section of your wall with chalkboard paint so you can write and draw right around your photos.
Here is how to set it up: first pick a patch about 3 by 4 feet on your bedroom wall. Coat it with chalkboard paint and let it cure fully. When it dries, your space becomes a place to create.
Arrange your photos on the chalkboard surface using removable photo stickers or tiny magnets. This keeps the wall safe and lets you swap pics anytime. Write captions next to each photo to tell the story behind the image. You can sketch light borders, arrows, or tiny doodles to frame the memories.
Use this wall as a living memory box. Change the layout with the seasons or mood. You’ll get a personal display that feels warm, playful, and alive.
Pro Tip: use removable photo stickers to avoid any damage to the chalkboard surface.
Care and upkeep: wipe the board with a damp cloth to erase chalk marks. If you want bolder lines, try chalk markers, but switch back to chalk for easy erasing.
Enjoy this growing wall of memories.
21. Vintage Ladder Photo Display
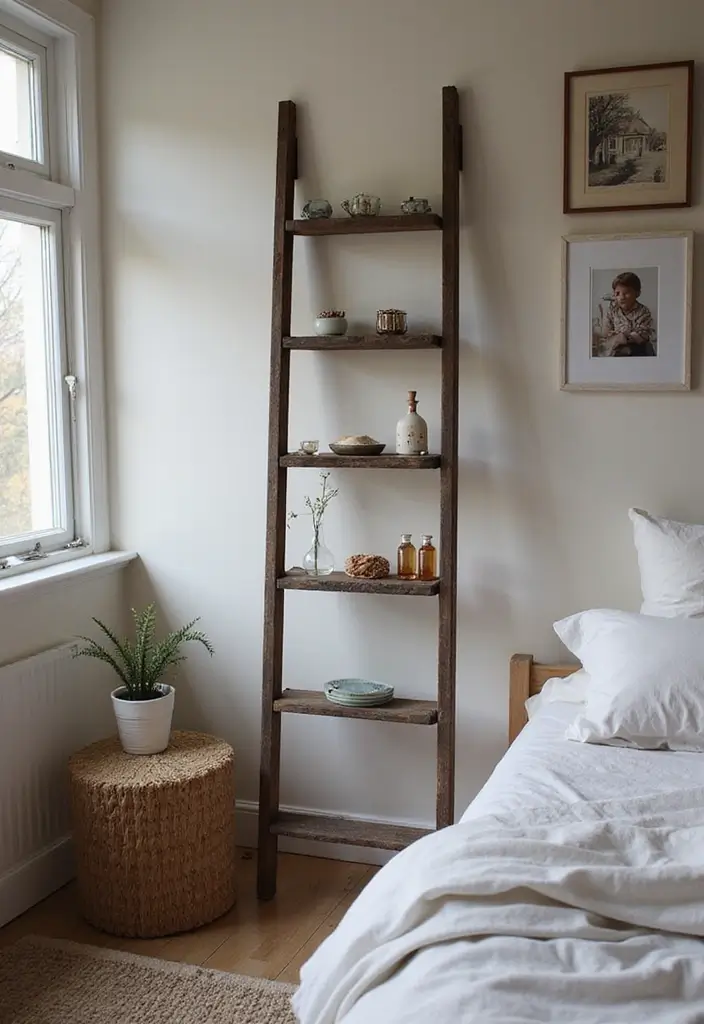
You want a warm, modern bedroom with a personal touch. A vintage ladder photo display can give you that. Lean the ladder against the wall. Hang photos from the rungs with clips or string. The ladder becomes a frame you can change anytime.
Make the display feel cozy. Wrap warm fairy lights around the rungs. Tuck a small plant or two on the base or on a shelf nearby. A soft rug under the ladder adds texture and warmth.
Here is how to set it up.
– Choose a ladder that fits your space. A distressed wood finish fits a Bohemian feel. If you prefer a cleaner look, pick smooth wood in a natural tone.
– Position the ladder so it leans slightly and sits steady. Use non-slip pads or a light wall anchor for safety.
– Hang photos with clips and knots. Vary sizes and heights for visual interest.
– Add small touches. A little greenery, warm lights, and a favorite card or print can pull the display together.
Design Insight: The ladder should echo your decor. A distressed finish fits a Boho vibe, while a sleek wood suits a modern warm room.
Rotate photos every few weeks to keep the look fresh.
22. Family Tree Photo Wall
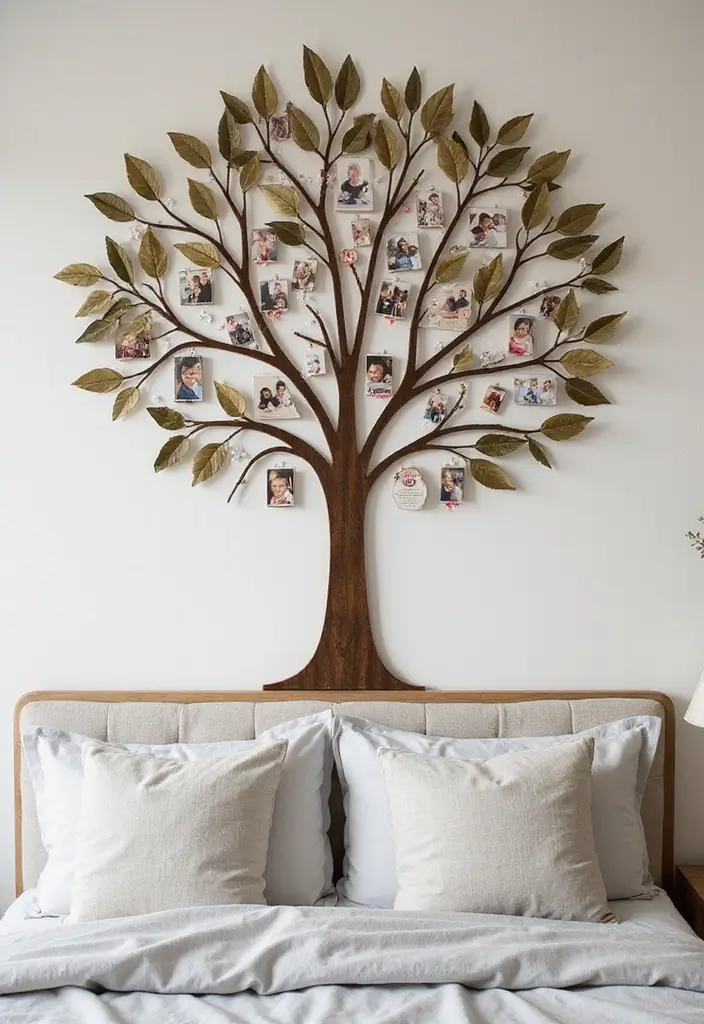
Looking for a bedroom wall that feels warm and personal? A family tree photo wall blends memories with art. The tree acts as a guide, with branches linking your pictures into one living story.
– Choose a wall and decide how big your tree should be.
– Sketch a simple trunk and branches on paper first, then plan each photo.
– Gather photos you want. Mix new moments with old favorites. Print in different sizes for variety.
– Pick frames in a few wood tones or soft colors. Use decorative paper leaves to mark family members and hold a photo or name.
– Lay the layout on the floor. This helps you see balance before you hang anything.
– Mount the pieces. Start with the trunk, add branches, then hang frames. Tape templates help keep spacing even.
– Add small details. You can string a thin cord between branches or add tiny LED lights for a subtle glow.
Creative Tip: Use different shades of green in your leaves and accents to symbolize growth and connection.
This setup brings a calm, cozy feel to your room. It reminds you of your roots while keeping a fresh, modern look. Easy to tweak as your family grows.
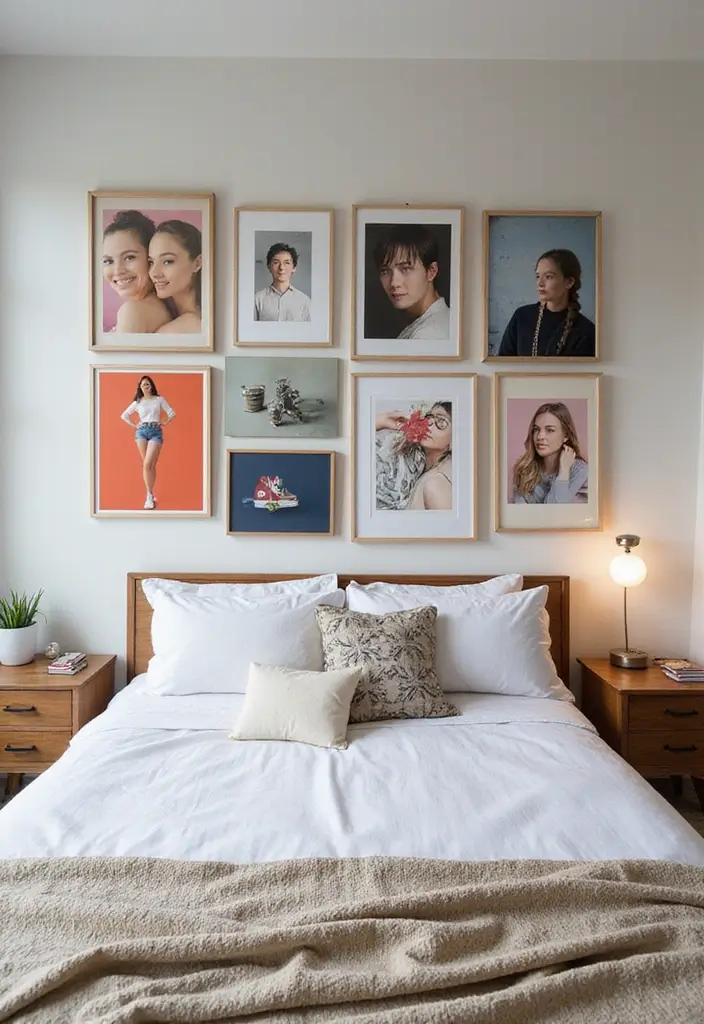
23. Personalized Storyboard Wall
Here is a fresh take on a personalized storyboard wall. It feels warm, looks tidy, and lets your life shine through photos. You tell a story with pictures.
– Gather 20–40 prints from trips, dates, and everyday highlights.
– Keep some wide shots and some portraits.
– Mix sizes and orientations for interest.
– Plan the layout. Start with a big centerpiece in the middle.
– Place smaller images around it.
– Use a temporary grid with paper templates on the wall.
– This keeps the flow smooth.
– Add short notes or symbols.
– A small word like home or a tiny heart stands for a memory.
– Let text be sparing.
– Tie the look together.
– Use a single color family for frames or matting.
– White, black, or wood tones work well.
– This keeps stories feeling connected.
– Install and swap.
– Choose lightweight frames or clips on a wire.
– Mount with removable adhesive so you can update as life changes.
– Lighting helps. Warm bulbs soften the room.
– Rotate photos every season to keep it fresh.
Inspiration Tip: Choose images with similar tones or a shared vibe to keep the wall cohesive.
Next steps: grab your photos, map your wall, and start laying out. Your room, your story.
This approach helps save wall space and keeps your room calm. If you want a simpler look, limit to 9–12 images. Replace old photos easily as life changes.
24. Craft Paper Backdrop with Photos
Looking for a photo wall that feels warm and modern? A craft paper backdrop can deliver that vibe.
Here is why this setup works: the paper creates a soft base that lets colors pop without looking busy.
– Pick a wall section that you want to cover with craft or wrapping paper, keeping it wide enough for multiple photos.
– Choose a pattern or color that matches your bedroom decor, whether you favor florals, geometric lines, or a solid shade.
– Plan the layout on the floor first so you can see how a grid or scattered placements feel before you commit.
– Trim the paper to fit the exact area, leaving a clean edge where it meets the wall.
– Attach the paper to the wall with painter’s tape, smoothing bubbles as you go.
– Arrange photos on the paper with a mix of sizes and orientations to create rhythm.
– Use removable tape to secure the photos so you can swap them later without damage.
Design Tip: Use removable tape to attach the photos, allowing easy swaps.
Next steps: take a quick photo of your layout, hang the frames, and adjust until the balance feels right. Keep the look flexible.
25. Interactive Photo Wall with QR Codes
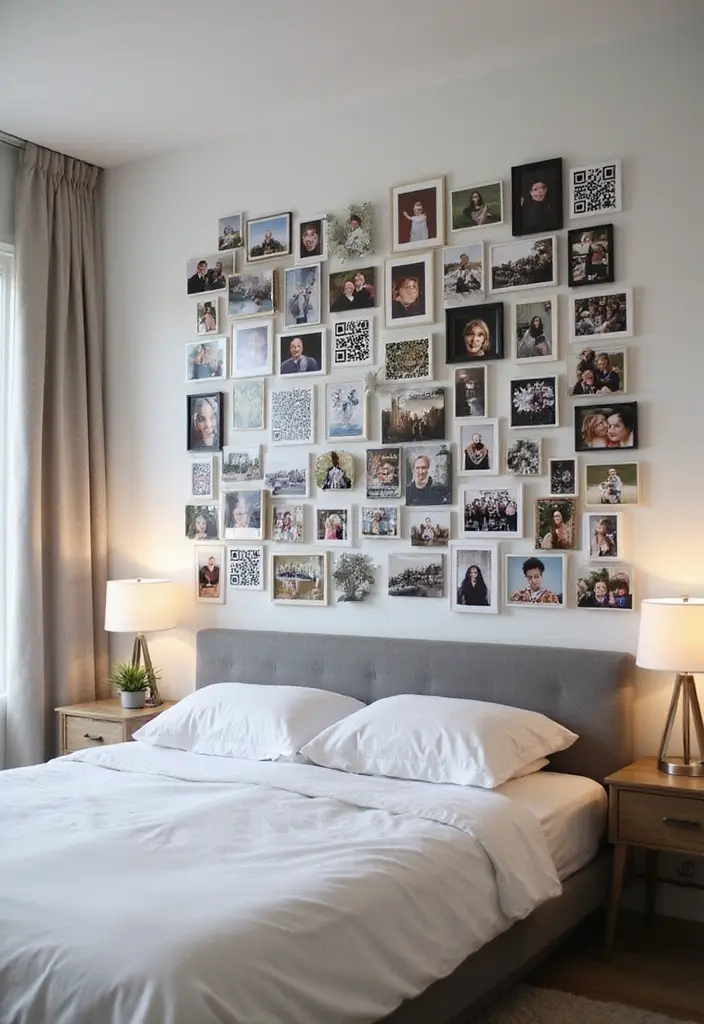
Want a photo wall that feels modern yet warm? Try an interactive wall with QR codes beside each photo. A quick scan can bring up a short video, a voice note, or the story behind the image. It adds depth without crowding your space and invites conversation.
Here is why it works and how to set it up:
– Choose 6–12 photos that share a vibe or color so the wall reads as one story.
– Pick a simple layout. A tight grid or even rows with even gaps keeps things tidy.
– Create a QR link for each photo. Link to a quick clip, a caption, or a memory stored online.
– Print small codes and place them below each photo on a neat label or card that fits your frame.
– Tip: Label codes clearly. Add a short title under each code, like “Lake Trip” or “First Snow.”
– Check visibility and scanning ease. Use high contrast and a code size that’s easy to scan from a few feet away.
– Keep the mood cozy. Match frame colors and avoid busy backgrounds that hide the codes.
Next steps: gather your favorite moments, decide where to hang, and test the codes with a few phones. Tweak spacing if needed, then enjoy a wall that tells more than just pictures.
Transform your photo wall into an interactive experience! With QR codes, each image tells a story, inviting warmth and conversation into your bedroom aesthetic.
Conclusion
Incorporating these 25 photo wall ideas into your bedroom decor can radically transform your space into a warm and inviting retreat. Each concept not only celebrates memories but also allows for creative expression that’s uniquely yours. Whether you choose to mix frames, use whimsical elements, or explore modern technology, the key is making it personal.
So gather your favorite photos, unleash your creativity, and bring these ideas to life in your bedroom!
Frequently Asked Questions
What Are Some Creative Ways to Arrange Photos on My Bedroom Wall?
There are numerous ways to get creative with your photo wall! You can try a gallery wall with vintage frames for a warm, lived-in feel or a hexagonal photo arrangement for a modern touch. For something playful, consider using colorful washi tape to pin photos directly to your wall without nails. Each idea not only showcases your memories but also enhances your bedroom’s aesthetic!
How Can I Make My Bedroom Photo Wall Feel Cozy?
To create a cozy atmosphere with your photo wall, consider incorporating soft lighting such as string lights paired with your photos. Additionally, choosing warm, earthy tones in your photo prints can add to that inviting vibe. Mixing textures, like adding a boho macramé photo hang or layered textiles, can also enhance warmth and comfort in your space.
What Themes Work Best for a Cozy Bedroom Photo Wall?
Themes can significantly influence the feel of your photo wall! You might consider a nature-inspired photo wall featuring landscapes and plants or a themed travel photo wall that captures your adventures. Personal stories can make your wall feel even cozier, so think about mixing art prints with your photos to showcase your interests and experiences.
How Do I Choose the Right Frames for My Bedroom Wall Decor?
Choosing the right frames can transform your photo wall! Mixing styles and sizes can create an engaging gallery effect. For a more modern look, consider minimalist frames, while vintage or ornate frames can add a cozy, nostalgic touch. Remember to keep a cohesive color palette in mind to ensure that your bedroom wall decor feels harmonious and visually appealing.
Can I Change My Photo Wall Decor Seasonally?
Absolutely! A seasonal photo wall is a fantastic way to keep your bedroom feeling fresh and inviting throughout the year. You can easily swap out photos or add new ones that reflect the current season or any special events. This approach not only keeps your decor dynamic but also allows you to celebrate new memories and experiences as they happen!
Related Topics
home decor
photo wall ideas
bohemian style
cozy bedroom
modern aesthetics
DIY photo displays
vintage frames
creative arrangements
minimalist design
seasonal decor
beginner friendly
interactive decor