


A complete low-voltage garden lighting system, transformer and all, takes one weekend and roughly $200–$400 in materials for most suburban yards. The step that ruins more projects than any other is the layout sketch: skip it, and you are almost guaranteed to buy cable you do not need or overload a single transformer with too long a run. Twelve-gauge wire handles up to 100 feet without voltage drop, but only if you measured the distance before you unspooled anything.
1. Plan the Layout

A rough sketch of your yard saves you from the most expensive mistake in low-voltage lighting: buying cable you do not need. I grab a clipboard and blank paper, sometimes graph paper if the beds are irregular, and walk the property with a pencil. Mark each fixture where you actually want light, not where the kit tells you to put it. For pathway lights, space them 6 to 8 feet apart; closer and you end up with a runway, farther apart and you trip in the gaps.
The transformer needs a home before you commit to anything else. It sits near the house, usually tucked behind a shrub or beside the AC unit, and it plugs into a GFCI outlet. That outlet is your anchor point. Measure from there to your first fixture, then between fixtures, because those distances decide your wire runs and whether one transformer handles the whole job or you split it into two zones. I have seen people plan twenty fixtures off a single transformer and end up with voltage drop at the far end; two transformers, each with its own sketch, fixes that before you dig.
Cable runs matter more than the fixtures themselves. You are not running twenty individual wires back to the box. Daisy chain, T-method, hub method, or some combination: the sketch is where you pick which one fits your shape of yard. Lay it out on paper and the trenching goes faster on Saturday morning.
2. Choose and Install the Transformer

A transformer sized wrong is the fastest way to kill a whole lighting project before the first fixture goes in. Add up every bulb’s wattage, then add 20% on top. A 100-watt load means you need at least a 120-watt unit, and that buffer is not negotiable if you ever want to add a path light later without swapping the whole box.
Mount it at least 12 inches above ground on a wall near a GFCI outlet, well away from sprinkler heads or downspouts. Stainless steel housings hold up better through seasons of rain and snow than plastic ones that get brittle after a couple of winters.
Select a transformer that can handle the total wattage of all your landscape lights plus an additional 20% for future expansion. For example, if your lighting system totals 100 watts, choose a transformer rated for at least 120 watts.
That 20% is your upgrade path. Skip it and you are buying twice.
Standard transformers with manual switches are the cheapest upfront. Smart transformers let you adjust timing from your phone, which matters if your schedule shifts week to week. Built-in timers or photocells are the set-and-forget option, and they are the ones I would pick for anyone who does not want another app on their home screen.
3. Run the Low-Voltage Cable

Start at the transformer and unspool the cable toward each fixture, keeping the run close to path edges or planting beds where future digging is less likely. Leave a generous loop at every light; you’ll want slack for connections and for shifting things later when plants grow or you change your mind.
Wire gauge matters more than most first-timers expect. 12-gauge cable handles runs up to 100 feet without voltage drop, while 14-gauge suits most medium yards and 16-gauge is fine only for short stretches under 50 feet. Thicker wire costs a few dollars more, but dim lights at the end of a long line are the expensive mistake.
Check that your cable is outdoor-rated for direct burial. That listing is what keeps moisture and corrosion from eating your connections over time.
4. Connect the Fixtures

Strip about half an inch of insulation from the main cable and each fixture wire. Brass barrel connectors hold up better than the plastic ones that come in most kits; they will not go brittle on you after a season of freeze and thaw. Slide the stripped ends into the barrel and tighten the Allen screws until the connection is firm.
Waterproof wire connectors filled with silicone are the right choice for path lights and spotlights that sit out in the weather. For submersible fixtures or places that stay wet, brass butt-splice connectors with heat shrink tubing give a tighter seal. Cut the cable with enough slack, about eighteen inches, so you can move or swap the fixture later without redoing the whole run.
At each connection, the main cable loops through without being cut, using a T-splice, or you break the run and join straight through. Either way, crimp or screw tight, then seal. A hair dryer works on heat shrink in a pinch, though a heat gun is faster. Test every light before you bury anything; a dim fixture usually means a loose connector, not a bad bulb.
5. Test the System

Flip the transformer on and walk the full run before you bury a single inch of cable. Every fixture should light, and the brightness should look even from end to end. Flickering or a lamp that stays dark usually means a loose connection or a nick in the wire, and both are easier to fix while everything is still above ground.
A multimeter takes the guesswork out of it. Touch the probes to the wires at your farthest fixture and check the reading. Voltage drop shows up as dimming at the end of the line, and if the number is too low, you still have time to swap to a heavier gauge wire or rebalance the run. The sources mention #10-2 or #12-2 for longer distances, and this is exactly when that choice pays off.
Once every connection is tight, every lamp is steady, and the voltage reads right where it should, you are clear to start burying. Wire buried at least 6 inches deep keeps it safe from pets, lawn equipment, and the freeze-thaw cycle. Come back after dark for final aiming, but only after the electrical side is locked in.
6. Bury the Cable

Low-voltage cable does not need to go deep, which is half the point of doing this yourself instead of calling an electrician. 4 to 6 inches is the usual depth, enough to keep the wire out of reach from a shovel or a curious dog but shallow enough that a flat shovel gets you there in a few minutes. I press the cable into the bottom of the trench with my fingers or the blunt end of a tool, then backfill with soil or mulch.
Hardscaping and tree roots are where this gets fiddly. Sharp rocks can wear through insulation over time, so I route around them when I can. Tree roots are tougher; I do not cut through anything thick and living, but I will thread the cable through gaps at the same depth if the root system leaves me no clean path. In spots where people walk constantly or where I run a mower, I go closer to 8 inches, though that is judgment rather than code. Speaking of which, low-voltage systems are not held to the burial depth rules that line-voltage wiring faces, which is why this project stays a weekend job instead of a permit job. Still, some areas want conduit under driveways or patios, so a quick check of local requirements is worth the five-minute phone call before you start filling the trench back in.
7. Adjust and Finalize
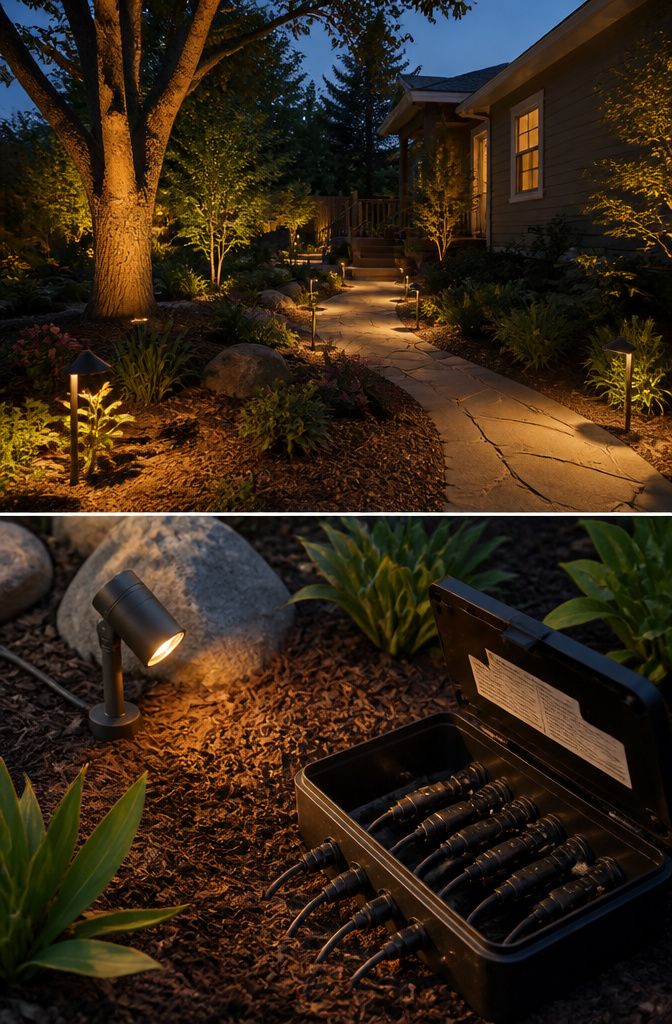
Small shifts in fixture angle change everything. A spotlight tilted too high washes out bark texture and sends glare into a window; drop it ten degrees and the same tree gains depth. I walk the yard after dark with a work light or the system live, nudging each fixture a few inches at a time. Path lights should hit the walkway, not your eyes, so I tilt the face down until the beam pools on stone or mulch and disappears at ankle height. Uplights need trial: grazing a trunk from one side carves shadow, dead-on flattens it.
The common mistake is setting fixtures where they looked right at noon. Shadows fall differently, and a stake that seemed perfect can leave a shrub in darkness or blast the siding white. I check from inside the house too, through windows, because that is the view that matters most nights. Once the angles hold, I straighten each stem with a level, firm the soil, and coil any extra cable below grade so it does not heave in frost. Clean up the trenches, sweep the path, and the job is finished.
Safety Precautions

Low-voltage garden lights are not no-risk. The transformer steps household current down to 12 or 24 volts, but the input side still carries full wall power. Disconnect the transformer at the breaker, not just the switch, before you touch a single wire. A wall switch can fail or be wired wrong, and you do not want to find that out with wet hands in the dark.
Every transformer needs a GFCI-protected outlet. That is the outlet with the test and reset buttons, and if your outdoor receptacle does not have them, stop and install one or hire an electrician. Water and electricity do not mix, so mount the transformer at least 5 feet from a pool or spa and 10 feet from any fountain. A light rain is enough to turn a too-close outlet into a real hazard.
Before your fingers go near any connection, check three things: the breaker is off, the outlet is GFCI, and the transformer housing is dry. Low voltage will not throw you across the yard, but a bad connection on the line side can start a fire or kill you just as dead as the mains that feed it.
Choosing Equipment

Transformer wattage is one of those things where rounding up saves you from doing the job twice. I add up every fixture I plan to install, then multiply that total by 1.2 or 1.25 to leave headroom. A 100-watt load means shopping for at least a 120-watt transformer, maybe 125. That extra cushion covers power loss across longer cable runs and leaves space for two or three more lights down the road without replacing the unit.
LED fixtures have practically replaced incandescent for this work, and the math shows why. An LED path light might draw 5 or 7 watts where an old incandescent pulled 20 or more. That efficiency means a smaller, cheaper transformer and thinner cable, but the real payoff is longevity. LEDs last years longer through freeze-thaw cycles and summer heat.
Fixture quality matters more than people expect. Brass holds up where aluminum corrodes, and waterproof connectors are not a place to pinch pennies. At the store, ask whether the housing is solid brass or cast aluminum, how the socket seals against moisture, and whether the transformer includes a photocell or timer. Those features run the lights automatically; without them, you are flipping a switch manually or buying timers separately.
Control Options
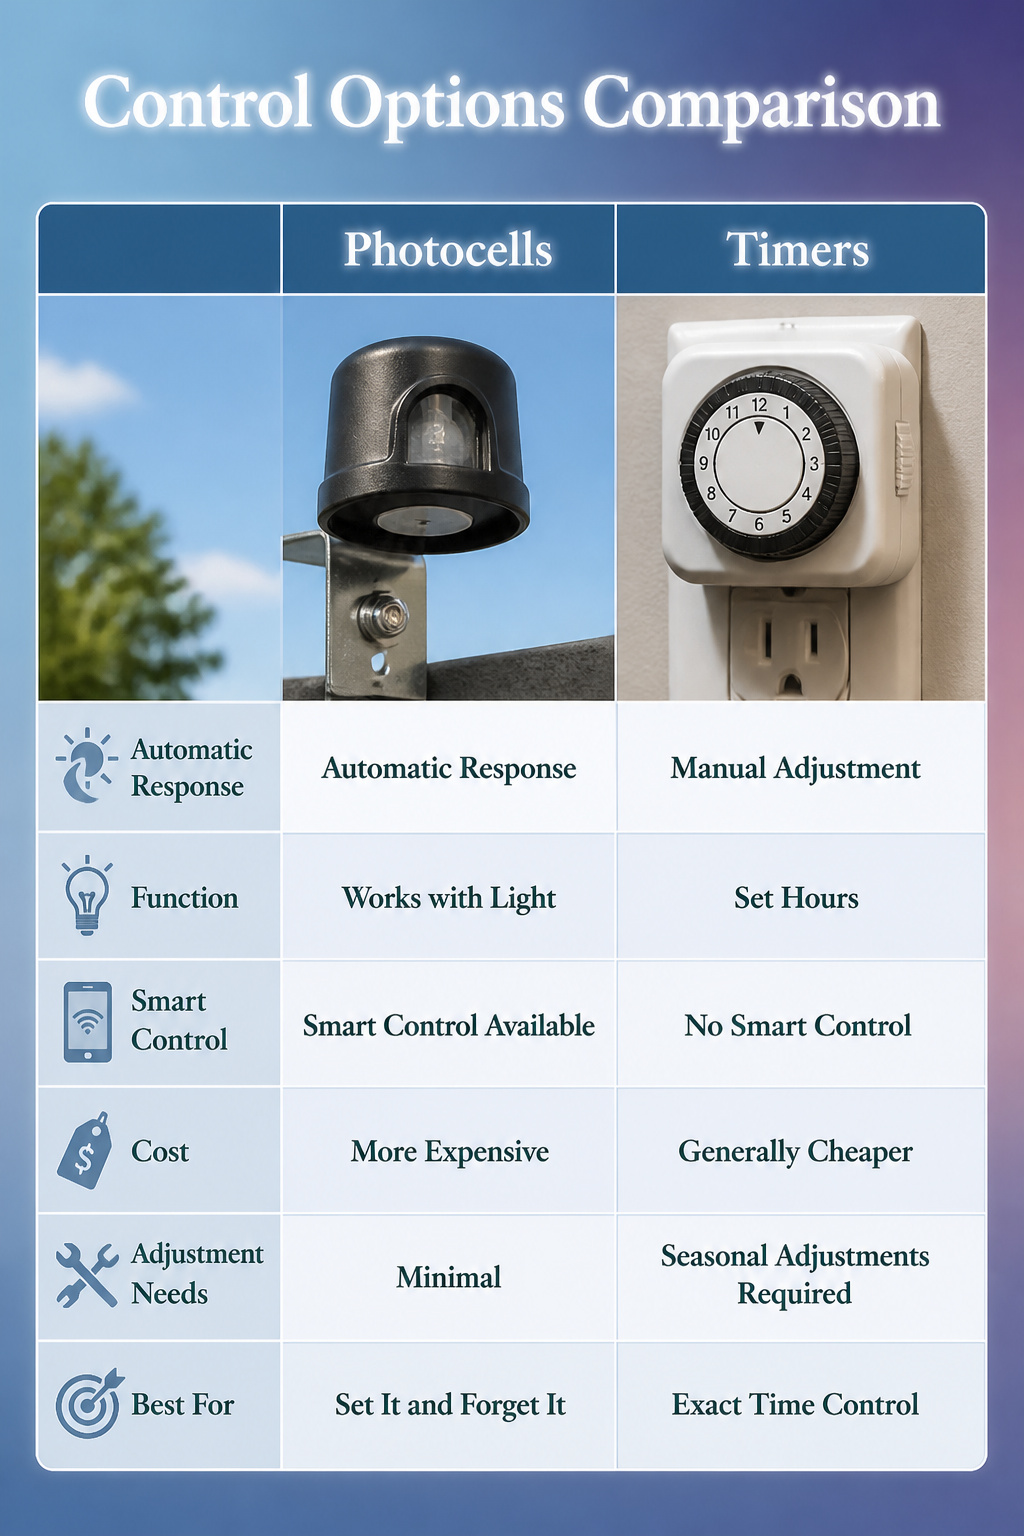
Every transformer needs some way to decide when the lights come on. Most units ship with at least one control built in, but the type matters more than you’d think.
- Photocells use a small sensor to read daylight and trigger the transformer at dusk, shutting off at dawn. They work fine when the transformer sits somewhere that actually sees the sky, though one blogger I read swapped hers out after her sensors kept firing five or ten minutes apart from each other. That staggered half her lights on, half off.
- Timers let you lock in exact hours, say 7:30 p.m. to 11:00 p.m., and skip the sensor entirely. The tradeoff is manual adjustment as sunset shifts through the seasons; come October, your 8:00 p.m. start leaves you in the dark for an hour.
- Smart controls and astronomical timers handle the sunset math automatically, adjusting daily through the year without a photocell window or your thumb on the dial. Alliance’s it2 transformer pairs that with app control over Bluetooth and WiFi for scheduling from inside the house. Some plug-in versions like the iTimerPRO-2 drop the astronomical feature into an existing indoor setup.
For a weekend project on a few hundred dollars, a basic timer or photocell usually covers it. Smart transformers earn their price if you want zoning, color temperature tweaks, or the ability to kill the lights from bed when you forgot.
Common Mistakes

A few missteps can turn a weekend project into a two-weekend fix. Here’s what to watch for.
- Overloading the transformer. Add up the wattage of every fixture before you buy. I once pushed a transformer past its rating and the lights flickered like a strobe. Most kits give you a number; stay under it by at least 20% so you have room to add later.
- Using cheap plastic connectors. The barrel connectors that ship with budget kits get brittle and crack. Brass barrel connectors cost a few dollars more and hold up through freeze-thaw cycles without corroding.
- Skipping the test before you bury. Run the full system at dusk, walk every light, and check for dim spots, flicker, or dead fixtures. A loose connection six inches down is a shovel job tomorrow; catch it while the wire is still on top of the grass.
Frequently Asked Questions
How do you install low-voltage landscape lighting?
Mount the transformer near a GFCI outlet, run outdoor-rated cable to each fixture, connect everything with waterproof connectors, test the full system at dusk, then bury the cable 4 to 6 inches deep. The article breaks this into seven steps, with planning the layout and choosing the right transformer wattage as the make-or-break early decisions.
What wire is used for low-voltage landscape lighting?
Outdoor-rated low-voltage cable in 16-, 14-, or 12-gauge sizes. The article specifies that 12-gauge handles runs up to 100 feet without voltage drop, while 14-gauge suits most medium yards and 16-gauge only works for short stretches under 50 feet. Always check that the cable is listed for direct burial.
How deep should landscape lighting wire be buried?
4 to 6 inches is standard, deep enough to avoid shovels and pets but shallow enough to dig by hand. The article notes you can go closer to 8 inches in high-traffic or mowing areas, and that low-voltage systems avoid the deeper burial rules that line-voltage wiring requires.
How many landscape lights can one transformer handle?
About 80% of the transformer’s rated wattage, though the article recommends sizing up by 20% above your total load to leave room for expansion. A 120-watt transformer comfortably runs a 100-watt system, and that buffer prevents the flickering and voltage drop that come from pushing a unit to its limit.